Tuesday, August 31, 2010

Celebrate Good Times! Pantry2Plate WINS Cuisinart's Get Cooking! Contest

Polenta Fries with Parmesan Dipping Sauce and Basil Oil

I am more than thrilled to announce that Pantry2Plate has won the latest series of Cuisinart's Get Cooking! Contest.  This contest makes it easy to get excited about being in the kitchen and the winning recipe truly came from one of the greatest pleasures of cooking...sharing good food and great times with remarkable friends.  The feedback from the Cuisinart Chefs is on point and something I've heard from another faithful reader (Squints, you call 'em like you see 'em!), so I will work on being a bit more descriptive in my posts.  How about the rest of you?  Anything else you would like to see?  Thanks for your support...I am grinning from ear-to-ear!

Check out the link below for what Cuisinart Chefs had to say:
http://www.cuisinart.com/recipes/get-cooking-contest/winners.html

The winning recipe post can be found in my archives and linked below:
http://pantry2plate.blogspot.com/2010/06/polenta-fries-with-basil-oil-and.html

Monday, August 30, 2010

Spaghetti Squash with Pesto

We found this weekend that the coming of fall is palpable.  What it means for our kitchen is scooping up the last of our favorite summer treats and transitioning into a new fall lineup.  I started to think ahead to how I can preserve the flavors of summer and enjoy them for a few months longer.  So in this week’s ‘Saturday’s Basket’, greens abound!  Our trip to the South of James Farmer’s Market always starts with a large coffee from Blanchard’s to help get the creative juices flowing and help us sort through what tastes we want for the week.  After we started to wake up, we picked up arugula & green beans from Victory Farms and a squash and basil bunch from Pleitez Produce.  The arugula and basil blended together make a healthy portion of pesto and pesto makes for a great freezer food. Once blended, portion the sauce into ice trays and freeze.  Pop out individual cubes whenever you are craving that summer sweetness.  Pesto paired with spaghetti squash was on plate for a great homemade Sunday dinner.  It’s an easy side dish and makes a great pasta substitute for those curbing the carbs.  Here’s the fix:


1 spaghetti squash

Olive oil

Salt & pepper


Preheat the oven to 425°.  Slice the squash in half and scoop out the strings and seeds (as you would for a pumpkin).  Place the squash on a baking dish, slice side up and drizzle olive oil over, sprinkle with salt and pepper.   That’s it!  Roast the squash until the fibers start to break down and you can easily shred the ‘meat’ with a fork.  It should fall right out of the shell when scraped.  I’ve found the easiest way to scrape the veggie out is by leaving it in the dish and holding one side with my kitchen tongs.  Shred right in the shell and then transfer to a serving bowl.


Basil and Arugula Pesto:


2 handfuls of fresh basil leaves

1 handful of fresh baby arugula

¼ cup walnuts

¼ cup parmesan cheese

Olive oil

Pinch of salt

A few cracks of fresh ground black pepper

 
In a food processor, add the greens, nuts and cheese.  While the processor is on, stream in olive oil until the pesto reaches a creamy, loose consistency.  Pesto is a preference food meaning, some like it chunky, some like it loose.  Some like it with a lot of cheese, some with a little.  It is a versatile sauce and dip and taste testing is always necessary.  On the last whirl around the processor, add a little salt (go light, salt is already a big contributor in the cheese so seasoning began with that addition) and a few cracks of pepper to taste.  The arugula will also help to give it a little bite so be sure to taste test as you go so as not to overdo the pepper.


Bring the two together by topping the roasted, hot spaghetti squash with a dollop of pesto.  Turn to coat and serve warm.  It’s a nice nod to summer flavors with a hint of what’s coming for fall.
Basket from market: basil, jalapeno cheddar bread, speghetti squash, arugula and green beans.

Saturday, August 28, 2010

Fresh Herb & Sunflower Chicken Piccata

Lemon and chicken go naturally together.  Throw in some fresh herbs and it's an end of the summer party.  I really wanted to go alternative on the breading and experiment with anything that would infuse flavor and texture.  Sunflower seeds and oatmeal worked really, really well.  So well in fact, there was no need for the 3 step breading process (flour, eggs, breading), I just pounded the chicken flat and pushed them right into the seed, oatmeal and herb mixture. It was clingy enough to stick and browned up beautifully.  The crunch was perfect and the herbs from the garden perfumed the kitchen and added fresh flavor to the chicken. Here's the new, healthy take on chicken piccata...

3 boneless, skinless chicken breasts, pounded flat

For 'breading':
1/4 cup roasted, salted sunflower seeds
1 packet instant oatmeal
6 sprigs of fresh thyme
1 stem (about 8-10 leaves) fresh oregano
4 fresh basil leaves
1 sprig rosemary
3 stems chives
fresh cracked black pepper

For sauce:
1/4 cup chicken broth (may use more for additional sauce)
1 fresh lemon
1 tsp capers
fresh cracked black pepper

Olive oil & butter for cooking. 

Preheat the oven to 350°. 

Remove the stems from the herbs and rough chop.  Add herbs to a food processor and pulse with seeds, oatmeal and a few cracks of black pepper until coarsely ground.  Spread the mixture onto a large prep plate and dredge the pounded chicken through the mixture.  Use your tongs to press the mixture into the chicken to help it stick.  In a non-stick pan, add enough olive oil to coat the bottom of the pan and over medium high heat, add 1 tbsp butter. Once melted, add chicken breasts and cook for about 2-3 minutes on each side or until golden brown.  Transfer to a non-stick baking sheet and bake for about 8-10 minutes.

In the same non-stick pan used to pan-fry the chicken, add chicken broth to deglaze. Use a wooden spoon to loosen up all bits from pan.  Slice one lemon in 1/2 (reserving a few rings to top the finished chicken) and squeeze all juice into the sauce.  Add the lemon halves into the pan while the sauce reduces.  Reduce on med-lo for about 8 minutes and stir in 1/4 tsp corn starch and a few cracks of black pepper. Add 1 tsp capers and keep on low until ready to serve. Add more chicken stock to balance flavor if necessary.

Top cooked chicken breasts with slices of lemon and then spoon sauce over top.  The chicken goes really well with rice or whole wheat pasta and a side of steamed broccoli which can also topped with a spoonful of sauce. Fresh, healthy, full of vitamins and minerals! 

What other breading substitutes have you tried?  Walnuts? Almonds?

Thursday, August 26, 2010

Healthy, Hearty Veggie Pasta Casserole - Freezer Friendly

I had a request for this earlier and it's something I've made to take to friends and neighbors in need of a little help.  It is a great casserole style pasta with lots of healthy veggies and protein that feeds a bunch or will freeze well for leftovers.  

1 box whole grain rotini or ziti
1 1b ground chicken
1 28 ounce can crushed tomatoes with basil
1 zucchini
¼ cup red onion
½ pint button mushrooms
1 package frozen spinach, thawed, drained and dried
1 roasted red pepper (I use the jar version in oil)
1 clove garlic
Basil leaves or basil paste
Tomato paste
Bay leaf
Olive oil
Fennel seed
Red pepper flakes
Salt and white pepper
Shredded mozzarella
Grated aged parmesan

Dice zucchini, onions, garlic, red pepper and quarter mushrooms.

Start by browning the ground chicken in a large skillet with palm full of fennel seeds and shake of red pepper flakes, salt and pepper to taste. Do not strain. Halfway through browning add zuchinni and mushrooms and let sauté but don’t overcook since the whole dish will be baked.

For sauce: in a medium sauce pan, add enough olive oil to coat bottom of pan.  Add red onion and garlic, sauté until translucent, add a pinch of salt and pepper.  Add tomatoes and begin to simmer.  Add bay leaf, 2-3 chopped basil leaves or 1 tblspn of basil paste and 1 tblespn of tomato paste.  Stir in roasted red pepper.  Let sauce simmer for at least 10 minutes.

Transfer sauce to skillet with chicken and veggies, add spinach to sauce and mix it all well.  Don’t forget to take out the bay leaf!

Cook pasta to al denté.  When done, transfer drained pasta to large casserole dish.  Add sauce over pasta and toss to coat.  Sprinkle mozzarella  over entire top and grate parmesean over.  Bake until bubbly and cheese starts to brown (at 350°). 

I think it would also be really tasty ‘Greek style’ with feta cheese baked in and just the parm on top. Enjoy and make it for someone in need of a helping hand.

Tuesday, August 24, 2010

Who Wants a Cookie? Chocolate Melt & Toffee Bit Cookies

My husband is a routine kinda guy and apparently his new routine involves finishing dinner and asking me when the cookies will be baked. "What cookies?" is usually how I respond, but last night I was feeling the sugar craze myself (not that his sugar cravings are any less important than mine, but I am the one baking them so I say when...I say whoooo...I say wheennn. Anyone? Anyone?).  As you guys know, baking does not come naturally to me, but my friends might say that the one sugary treat I am confident in making is a delicious batch of toffee cookies.  The recipe used to be on the back of the Heath Bar Toffee Bit Pieces bag and it makes the most indulgent, chewy, buttery-goodness bites you've have ever had.  Last night called for chocolate though so the recipe got a few modifications and shake ups and the outcome was nothing short of a cookie masterpiece.

Here's what I put together:

2 sticks butter
2/3 cups granulated sugar
1 & 1/2 cups brown sugar
1.5 tsp pure vanilla
3 eggs
3 & 1/2 cups all purpose flour
2 tsp baking soda
2 tsp cream of tartar
1/4 tsp salt
1 bag toffee chips
1/4 - 1/2 cup shaved semi-sweet baking chocolate

Preheat the oven to 350°.  In your favorite stand mixer, blend the 2 sticks, room temp butter (I used salted butter for this recipe which I think is ok because these are toffee and chocolate AND I am not sure how much I buy into the salted vs. unsalted baking controversy).  If you are taking straight from the fridge, pop the butter into the microwave for 10 seconds to loosen it up.  Put the mixer on low and add in sugars, vanilla and eggs one at a time.

In a separate bowl, sift together the flour, baking soda, cream of tartar and salt. With the mixer on low, slowly add in the sifted ingredients. Hopefully your kitchen won't end up looking like the North Pole as mine did, but baking is meant to be messy, right? Once the ingredients are incorporated fold in the chips and as much chocolate as you like. 

Drop mounds on a non-stick or airbake sheet and bake for 8-11 minutes or until a beautiful golden color and should make about 3-4 dozen cookies.  They'll deflate a little at the very end and definitely when you bring them out to cool.  Served up warm with milk, you will be in heaven. I also thought about sandwiching two together with a marshmallow center...maybe I'll try that tonight...

I also froze the dough I didn't bake last night so I will be sure to post if those are just as tasty as the fresh.  What's your favorite cookie recipe? 

Monday, August 23, 2010

Cuisinart's 'Get Cooking' Contest - who will be the winner?!


I can't wait to hear the results of Cuisinart's 'Get Cooking!' Contest.  Pantry2Plate was selected as a finalist and they are expected to announce the winner this week!  Have you tried the Polenta Fries yet?  One bite and you'll be hooked! 

Sunday, August 22, 2010

Whole Wheat Blueberry Pancakes

I've been in carb denial over the past 3 weeks and I woke up this morning craving pancakes.  Rarely do I reach for something sweet in the morning, not even sugar in the coffee, so this was an urge I didn't want to pass up.  However, trying to defeat my love of all things white flour, I went for a whole wheat alternative and it turns out white flour is for suckers.  Two silver dollar pancakes later, I am filled to the brim with fiber packed goodness.

Here's the recipe:

2 cups whole wheat flour
1 1/2 tsp baking powder
1 tsp baking soda
1/2 tsp salt
2 tbsp packed brown sugar
6 tbsp unsweetened applesauce
6 tbsp fat free Greek yogurt
1 egg
1 + 1/4 cup 2% milk

Sift the dry ingredients together first (just add the brown sugar after sifting), make a well in the center of the dry mix and add the egg, applesauce and yogurt. Using a hand mixer or a whisk, begin to add the milk, 1 cup to start and then the remaining as needed to thin out the batter (use up to 1.5 cups if necessary).

In a non-stick pan, melt 1 tbsp butter over medium heat.  When bubbles start to form in the butter, add 1/2 a soup ladle of batter to make small sized pancakes, more if you like large rounds. The pancakes are ready to flip when the bubbles that have formed in the batter begin to pop.  The edges will be browned from the butter and the second side will take less time than the first.  When making pancakes, I use my Le Crueset covered casserole dish to store the pancakes and keep them warm while I cook the remaining batter.

This mix is a great with accompaniments! I added rinsed blueberries to mine but bananas and walnuts would be delicious or chocolate chip pancakes.  Nutella anyone?

Friday, August 20, 2010

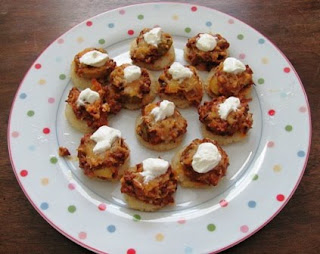
Supper Club Apps - Grits Toast with Soy Chorizo & Tomatillo Topping

So if I had access to Trader Joe's Vegan Soy Chorizo everyday, I may seriously consider going vegan or at least vegetarian.  I promise you, you would be hard pressed to taste the difference between this plant based product and it's piggy counterpart.  It would be delicious in breakfast burritos or maybe even somehow formed into a pattie for a new take on a spicy burger.  For last night's Supper Club Surprise, we had it atop grits toast, mashed with roasted tomatillos and topped with a little dollop of my favorite - 2% plain Greek yogurt. Grits toast is a cinch and fun to do.  Here's how it came together:


Quick Fix Grits - 3/4 cup
3 cups chicken broth
1/4 tsp of salt (can be omitted, chicken broth is plenty flavorful)
1/3 link of Trader Joe's vegan soy chorizo (or 1/2 cup when crumbled and cooked) or your favorite chorizo
8 tomatillos
1/4 hot pepper
olive oil
garlic salt
pepper
1 tbsp lite cream cheese
1 tbsp olive oil mayo
2 tbsp shredded monterey jack/cheddar blend and more for topping
2% plain Greek yogurt

Start by fixing the grits...and as Paula always says, stir your little heart out in the beginning or you'll end up with lumpy grits. Once the broth comes to a boil, it should take about 5 minutes to get them to a creamy consistency.  They should pour easily into a jellyroll pan and smooth out evenly.  Too long and they'll be one big, pasty lump.  The grits then go into the fridge for at least 30 minutes. I would have liked for the final 'toast' to be a little thicker, so next time I will either use a smaller pan (I used a 9"x13") or make more grits.  Here's the jellyroll pan shot:

While the grits are chillin', move on to the topping and try not to eat it all before you can put the final product together (I struggled a little with this step).  Cook up the chorizo in a fry pan and roast the tomatillos and hot pepper with some olive oil, garlic salt and pepper at 400° for about 10-15 minutes until you have a little char (flip on the broiler if you need to).  If you haven't had tomatillos, they add a cool green color and a little tartness to a sauce or salsa.  You'll usually find them near the tomatoes, look for a smaller fruit in an earthy green husk.  The husk comes off and they need a good rinse to remove the stickiness.  I think the insides look like an eggplant which is confusing but who cares?  They are very cool and tasty. So, after the roasting is done, give them all a rough chop and then transfer the veggies and the chorizo to a mixing bowl and add the remaining ingredients (except for the Greek yogurt, that's for the top).  Give them all a stir to combine.
Crumbled Chorizo

Now, take the chilled grits from the fridge and use a medium sized cookie cutter to form the toast rounds.  Transfer to another non-stick cookie sheet and bake at 375° for 15-20 minutes, flipping once.  The grits will get a little browned around the edges...delicious.  Now they are ready to be topped with the chorizo blend, a few shreds of cheese and baked again until heated through and the cheese is melted.  Top with the yogurt and serve it up warm!  The chorizo and pepper give it a hit of spiciness, the tomatillos a little tartness and the yogurt cools it right off.  These were a supper club hit!
Aren't they cute on Woo's pretty polka plate?

Wednesday, August 18, 2010

Eat, Pray...Love - well, at least the food

So a few of us went to see Eat, Pray, Love last night and I have to say it wasn't my favorite. But then again, neither was the book so why did I think the movie would be better? Maybe that old saying, 'the movie's never as good as the book' was stuck in my head and by hope of reverse interpretation, I thought the movie had to be better. I thought by some divine producing intervention, I would enjoy the story more as it was acted out before my very eyes. And to be honest, the story wasn't the issue. But I digress.

The point of me sharing this is to talk about the food. That's the one part of the story I firmly support and believe...Italy is meant to be experienced through the food. To see antipasti plated in front of some lucky patron is to be inspired to serve something simply and tastefully using a few good ingredients from the environment by which you are surrounded. Maybe I was hungry going in but I found myself daydreaming during the Rome scenes of a day where they have smell-a-movie or cinema scent-sations. We could have all been in Rome last night if they had opened the vents and pumped in the smells from the trattoria...basil, olive oil, ragu, espresso....I can almost taste it.


So, tonight's dinner will have an Italian theme for sure. It won't be as delicious as the meal we had from Trattoria der Pallaro last fall while in Rome but I just can't take it anymore...I need a heavy dose of carbs and vat of vino.

Tuesday, August 17, 2010

Winner of the Kitchen Gadget Giveaway!

We have a winner of the first ever Pantry2Plate Kitchen Gadget Giveaway!  Thanks for following, Suzie, we hope you enjoy your new kitchen gadgets.  Happy cooking!

Sunday, August 15, 2010

Rosemary Crusted Lamb Chops with Lemon Minted Peas

So, I have to start by saying that I can count on one hand the number of times I've had lamb.  However, while at the store this morning, I found a small rack of lamb for less that $2 and it was the perfect amount for two.  Knowing 3 things: I like peas, I have an abundance of mint and I'm a fan of a tender cut of meat with almost any kind of sauce - I decided to go for it. With that out in the open, I have one thing to say - what, for the love of Pete, was I waiting for?  The combination of peas, mint, lamb and rosemary could quite possibly be sent from Heaven. Here's how it came together for us tonight...

For the lamb:
3 sprigs of fresh rosemary, coarse chop
1 tbsp dijon
1 tsp garlic salt
juice of 1/2 lemon
freshly cracked black pepper
extra virgin olive oil

Trim the fat from the rack, pat dry and season both sides with salt & pepper.  Combine the ingredients above, whisking the olive oil in until a thick paste forms. Smear the mixture over all sides of the lamb and refrigerate for at least an hour, longer if you have the time.


Preheat the oven to 375° and in a heavy bottom sauté pan that can be transferred to the oven (I use my cast iron skillet), warm 2 tbsps of olive oil over medium-hi heat.  When the oil starts to ripple, add the rack of lamb fat side down to brown, turning once at 3 minutes and doing the same on the opposite side.  Transfer the entire pan to the oven and let it cook for 12-14 minutes depending on your temperature preference. Remove the lamb from the pan and place on a chopping board, cover with foil and let rest for at least 5 minutes. 

For the sauce:
Move the sauté pan back to the stovetop with the drippings and warm through on medium-low heat. Add 2 cloves of minced garlic and sauté.  Using a whisk, add 1 turn of a dry red wine, 1/2 cup of chicken stock, 1 tbsp butter and 1 sprig of rosemary, coarsely chopped.  Let the sauce reduce down over heat and to finish, add 1 tbsp of plain greek yogurt.  Keep warm until you are ready to serve.


Lemon Minted Smashed Peas
2 cups frozen young peas, blanched
juice of 1/2 lemon
1/4 cup chicken stock
8-10 leaves fresh mint, finely chopped
1/4 tsp of freshly chopped rosemary
1/4 tsp garlic salt
freshly cracked black pepper

Blanch the peas first and then transfer to a sauce pot.  Over low heat, warm all ingredients above through. Using a hand blender, gently mash the peas, leaving some whole.  Finish with a little pecorino romano.


To plate, layer the smashed peas first, top with 3 chops and then drizzle 1-2 tbsps of the sauce over the lamb.  Top with chives to make it pretty. 

Clean Out Cabinets Bean Dip

Staring down a lazy Sunday and one actually in town, I did what I always do...tackle a kitchen clean out and pantry reorganization job.  After I quick trip to the grocery store this morning, I found that I was running out of room in the pantry...not a problem I often run into but it happened today. So, out with the old and in with the new.  I had cans upon cans of beans that needed to see the light of day so a quick fix was in order.  I love Southern Caviar, (Paula Deen is the southern cooking queen!) so here's today's variation on the tailgate favorite based on what I had to use:
1 can black beans
1 can garbanzo beans
1 can northern beans
1 small can Rotel with green chilis
1 medium yellow onion
1 pint sunburst tomatoes
2 cloves of garlic
10 leaves fresh basil
1 bottle of Trader Joe's Tuscan Italian Dressing
Salt and Pepper

Dice the onions and garlic, half or quarter the tomatoes and roll the basil leaves together for a chiffonade.  Drain all the beans and rinse.  All goes into one bowl, toss with the dressing and salt and pepper to taste.  I love this dip or bean salad or whatever you want to call it because it is so versatile.  Today, I enjoyed it with soy and flax seed tortilla chips but I think it's great over romaine lettuce with grilled chicken or even served bruschetta style over grilled garlic bread.  It's a great way to empty the cabinets and enjoy a protein packed snack!

PS- Don't forget to sign up as a 'follower' to the blog to be entered into the Kitchen Gadget Giveaway!

Clean Out the Cabinets Bean Dip

Thursday, August 12, 2010

Kitchen Gadget Giveaway for Pantry2Plate Followers

It just so happens that I have two brand-new, stainless steel, favorite kitchen gadgets ready for someone to enjoy!  Since I've moved over to Blogger, I've decided to host a GIVEAWAY as a thank you to those who are continuing to read Pantry2Plate posts.  To be eligible, you have to sign up as a 'follower' to the blog by Monday, August 16th at 5:00 p.m. EST.  I will then randomly draw a name from the [chef's] hat and email the winner! The package will arrive with the two gadgets and tips on how to use them. This, hopefully, will be the start of many giveaways but you must be a follower to be eligible! Hope you guys are having a cook-happy week, I just made it back from Trader Joe's and am planning a delicious dish for tonight...stay tuned!

Monday, August 9, 2010

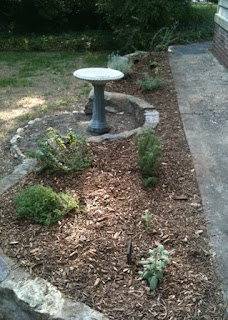
Project Garden Grow- Phase I, Step 2

To say I am thrilled with this change is an understatement!  Yesterday, I transplanted my current herb garden to the area we demo'd last weekend.  It was a ridiculous amount of work from the digging, cultivating, covering, weeding, digging again and finally planting but in the end, the result looks fantastic.  It's so late in the season, I hope these herbs I've moved will make it through - I've got two varieties of sage, thyme, oregano, two varieties of lavender, rosemary, sweet basil, Thai basil and chives.  And the best part is, these guys have room to grow.  I can't wait for next year!

The last step to finishing this area is to fill in the empty space around the bird bath.  I'm probably going to end up with just a ground cover...I am thinking elfin thyme, it's like a carpet of tiny flowers in the spring and the green leaves are lush and abundant.  That will have to wait for now while I figure out the best time to plant....any thoughts? I think I am also ordering this seed starting system and this guide book to help me get ready for next year.  I'm like a kid at Christmas...

Baked Zucchini Casserole

So a friend & frequenter of the blog, has a very cool garden at the bottom of a little hill in her backyard.  Apparently, it is the prime spot for zucchini and squash growing because it produced a whopper of a vegetable that was harvested last week. As a thank you for watching her pup, she saved this ginormous zucchini for me as long as I promised to write about what I made.  It was so bigger than an acorn squash! I got a little creative and decided to do that oh so fun trick of serving the finished product in the shell of the vegetable from which it was made. Take a look at the finished product:
Now, it was tasty, but it could have been better.  What I learned was that I should have prebaked the zucchini boats to soften them a little.  I did bake the finished product but it wasn't in long enough to really soften the veggie.  So, lesson learned.  Here's what I did do:

Sliced the veggie in half and scooped out the 'meat'.  This was diced along with 1 shallot, 10 grape tomatoes, 1 garlic clove and 2 handfuls of arugula.  In a sauté pan, I added about 1 tbsp of extra virgin olive oil and 6 small links of turkey sausage.  I browned the sausage over medium-hi heat until it was almost cooked through and then added the veggies to sauté.  For seasoning I added 1 palmful of fennel seed and a few shakes of crushed red pepper flakes, salt and pepper. Yumm. The veggies released a fair amount of liquid packed with flavor, so instead of draining, I added 1/4 cup of Italian flavored breadcrumbs and a handful of parmigianno reggiano. 
Next I drizzled the zucchini boats with olive oil and seasoned with S & P. I transferred the stuffing to the boats (divided equally between the two) and topped the boats with breadcrumbs, shredded mozzarella and parmigiano reggiano. 
It went into a casserole dish and into the oven for 15 minutes at 375° and came out toasty and delicious.  It was a complete meal for me but I also made a side dish of pasta drizzled with garlic infused olive oil and topped with a little more cheese for the man.  He was a happy camper and if he couldn't see the boats, he wouldn't have known he was eating a veggie-full meal.  He ate it up just the same though!

Thursday, August 5, 2010

Zucchini with Arugula Pesto and Summertime Tomatoes

Summer Beauty!
Summer veggies everywhere!  SOTJ Farmer's Market provided me with a big bag of arugula this past weekend so I, being the lover of pesto that I am, decided to blend it up and make a little peppery delight.  Here's what I did:

Into my Cuisinart food processor, I added two handfuls of arugula, a handful of walnuts, 2 cloves of garlic and a generous heaping of parmigiano reggiano.  The arugula is peppery enough and the cheese is plenty salty so really there is no need for extra seasoning.  While pulsing away, I drizzled in some extra virgin olive oil until it was a beautiful, vibrant green paste.  I could use this on anything (who am I kidding, I could eat it by the spoonful) but this time I decided to add it to the side dish. I topped the hot sauté of summer tomatoes and ribbons of zucchini that had their turn in a hot pan with a couple of turns of olive oil.   While the blend was still piping hot, I added a dollop of the pesto until it lightly coated each bite.  Finished with a sprinkle of the cheese and deliciousness was served!