Tuesday, December 21, 2010

Gluten Free Adventures-Holiday Cookies, Take 1

No, you aren't wrong...it's everywhere. Gluten free pasta, gluten free breads, cookies and treats. For reasons not worth going into, I've gone gluten free for about 10 days now. No need to bore you with the specifics but I am hoping for feedback and recommendations as I enter a new phase in my kitchen wizardry. Tonight, I experimented with gluten free, triple chocolate and cranberry cookies and so far so good. However, they are pretty crumbly so I am sure there is a way to remedy this (preferably it's a low cost fix). Let the recommendations commence!
Here's the recipe I converted:

* 1 cup all purpose flour
* 1/2 teaspoon baking soda
* 1/2 teaspoon cinnamon
* 1/4 teaspoon salt
* 10 tablespoons (1 1/4 sticks) unsalted butter, room temperature
* 1/2 cup sugar
* 1/2 cup (packed) golden brown sugar
* 1 large egg
* 1 teaspoon vanilla extract
* 1 cup old-fashioned oats
* 1/2 cup semisweet chocolate chips
* 1/2 cup milk chocolate chips
* 1/2 cup white chocolate chips
* 1/2 cup coarsely chopped fresh or frozen cranberries
* 2 ounces milk chocolate or white chocolate, chopped (for drizzling)


In full disclosure, I dropped 1 tbsp of butter and added about 1 tbsp of cinnamon pear jam. The cookies are delicious but they fall apart easily. Instead of me sharing my conversion, who cares to share how they would convert to gluten free? Thanks for the advice!

Tuesday, November 23, 2010

Deal of the Week - About a Million of 'Em!

There are so many amazing deals this week due to the holiday push.  Amazon has got deals like you wouldn't believe...click the 'Amazon's Amazing Kitchen Deals' link below and you will see all the great Kitchen deals they have in store - Up to 40% off popular small appliances, knives and kitchen tools.  I promise you will not be disappointed.

Amazon's Amazing Kitchen Deals brought to you by Pantry2Plate

Wednesday, November 17, 2010

Deal of the Week - Cool Mom Picks for Foodies and Bakers

Shopping shopping shopping!  Check out the banner to the right 'Cool Mom Picks'.  I included their holiday guide link here because I was perusing their selections and they chose some really great stuff for the foodies and bakers in your life.  Be sure to click through and let me know what you see!

Monday, November 15, 2010

Farmer's Market Find! Osage Oranges

Quick post to share what I found at the market this weekend...osage oranges or green brains.  They made such a cool centerpiece with clementines in a shimmer bowl from Crate & Barrel.  It's hard to find a lot of information about these online but what I've found is that they are inedible fruit that grow on thorned trees.  Apparently they fell out of favor with the invention of barbed wire. Prior to that, farmers used them for hedges to keep cattle out or in but it wasn't a fail-safe plan since cattle were lost due to choking on the fruit.  Some sites claim the fruit is a natural insect repellent, especially for spiders.  We'll see about that...for now, I just think they're purdy.

Friday, November 12, 2010

Tri Tips with Red Wine Reduction and Garlic Fries

Steak and potatoes. Yum. Tri tips are a versatile cut of beef that are affordable and can be prepared in many different ways.  It's often used in chile con carne but is equally tasty grilled, baked, however you like. Served with fries, well, it's just a good ole classic but kicked up with a 'gourmet' olive oil and you've got something special. 
Olive oil infused with garlic and rosemary does wonderful aroma things in the kitchen...add it to a julienned baking potato and you are in some kind of foodie heaven.  It's such an easy trick but a powerful one, you'll want to start infusing everything into oil.  Start with a few tablespoons of olive oil into a sauce pan over low heat, crush a few cloves of garlic and throw them in.  I added some rough chopped rosemary sprigs because I wanted to carry that flavor through the meal.  Let it hang out for a bit on the stove and your nose will tell you when it's ready to be used.  You don't want hi heat for this one because the garlic will burn easily.  Just keep it low and let it do it's thing for a few minutes.
From there I took one baking potato (I was cooking for 2) and sliced into shoestring sized french fries.  Start by cutting it in half lengthwise and then cut each half into strips (a little smaller than a 1/4 inch thick), usually you can get about 8 strips per half.  Stack the strips together an slice them lengthwise into even smaller strips and you have shoestring fries.  Once you've removed the oil from the stove and discarded the garlic cloves, drizzle the oil over the fries to coat.  Sprinkle with salt and pepper and bake at 425° for about 10-15 minutes or until crisp. Once baked, remove from the baking sheet and transfer to paper towel to help remove some excess oil.  Be sure to add more salt while they are still hot.
While those are baking away, use a cast iron skillet over medium high heat with a drizzle of olive oil to sear the seasoned tri tips on each side (just salt and pepper liberally).  Once the tri tips have seared, they'll go onto a baking sheet to finish cooking in the oven for about 5 more minutes or longer if you like them closer to medium or well done.

Using the same cast iron skillet, add about 3 turns of a dry red wine to deglaze the pan and get the bits of flavor up from the bottom.  Heat should be low to medium and it should reduce for about 2 minutes.  Next add 2 tbsp of butter, 1 tbsp water, chopped mushrooms and thin sliced shallots.  Reduce for another 3 minutes and finish with chopped rosemary and salt and pepper.

Use the remaining infused olive oil to sauté broccolini and you've got a steakhouse meal in under 20 minutes.

Shopping List:

Tri tips
1 baking potato
broccolini
cremini mushrooms
1 shallot
olive oil
rosemary
garlic cloves

That's it!

Monday, November 8, 2010

Deal of the Week - Etsy.com Cupcake Jars by Nummy Crummies


Cupcake in a jar?!  Sign me up.  What a perfect gift or pick-me-up for a friend having a bad day.  Nummy Crummies brings you a wide selection of Cupcakes in a Jar through Etsy.com (either click below or search on Etsy) and they even have a 'buy-rent-return' option to encourage people to reuse the jars.  For just $25 you, or one lucky friend, gets 5 Cupcake Jars with flavors to choose from like s'mores, pancake with maple frosting, red velvet with cream cheese frosting, double chocolate, and plenty more.  These are awesome little treats for you or someone you ♥.


Nummy Crummies Cupcake Jars

Wednesday, November 3, 2010

Local Market Pan Roasted Kohlrabi and Brussels Sprouts

It was a crisp Saturday morning at the market and there were still plenty of foodies to be found plus a few new selections in the produce department-one of which being a cousin to cabbage, kohlrabi.  For those of you not familiar with kohlrabi, it is a crazy looking, softball-sized, bulbous vegetable that resembles a turnip in shades of either purple or light green color.   The leaves can be eaten but the flesh of the vegetable is usually what people are after. It has a taste similar to that of the stem of broccoli, soft enough to eat raw once peeled but also delicious when cooked. 
Cooking for two, I grabbed kohlrabi from Thistledowne Farm and a small bunch of brussels sprouts from Pleitez Produce to make a delicious and seasonal side dish.  Here’s how it came together:
Pan Roasted Veggies:
1 tsp olive oil
2 tbsp cubed pancetta
1 tbsp butter
1 kohlrabi head
8 brussels sprouts, halved
1 tbsp apple cider vinegar
hot sauce
salt & pepper
Start by removing the stems and leaves from kohlrabi and peeling outer layer. I used a paring knife and trimmed the outside much like I would a mango (trim the bottom to create a flat surface to stand veggie upright, use knife to trim about 1/4 inch off flesh, working from the top of the veggie down and rotating until all exterior is removed).  Cut into bite sized pieces that are roughly the same size as the halved brussels sprouts.
Add tsp olive oil and pancetta to a skillet over medium heat to brown.  Once a good color has formed on the pancetta, transfer to a plate to reserve and drain excess grease.  Add butter to the same skillet and transfer brussels sprouts and kohlrabi, season with salt and pepper.  Using a spatula, move the vegetables around to coat all in the butter and pancetta drippings.  Continue to cook for 6-8 minutes, stirring occasionally to develop caramel color.  To finish, lower heat, add apple cider vinegar and a few dashes of hot sauce and add the pancetta back into the skillet.  Toss to coat and serve warm.
Pork Chops with Mushroom Gravy and Pan Roasted Kohlrabi & Brussels Sprouts
We also picked up a quart of Apple Cider from the Thistledowne booth (cider from Morris Orchard in Monroe, VA) for Hot Spiced Cider (cider + Captain Morgan’s + cinnamon + cloves + warmed on the stove = delicious) and a half loaf of 1/2 Whole Wheat bread from Norwood Cottage Bakery, whose last SOTJ market appearance was last Saturday.  Not to worry though, they now have two online ordering options for Fall and Winter, be sure to check out their website for more details.

Tuesday, November 2, 2010

Deal of the Week-Sur La Table Revol Sale


This one is going on until December 1st, which makes it the perfect Holiday planning sale reminder.  The baking and serving dishes are beautifully crafted and can be used in a variety of situations.  Be sure to check out the bakers, the lids can be turned into trivets to take straight to the table...ingenious!

Sur La Table Revol Sale Up to 20% Off!

Wednesday, October 27, 2010

Pancetta Pumpkin Fritters with Cinnamon Whipped Cream

Delicious, sweet and salty, non-traditional seasonal dessert that comes together in no-time flat!
Pancetta Pumpkin Fritters with Cinnamon Whipped Cream

Fritters:
1 cup pumpkin*
2 tbsp melted butter (unsalted)
1/3 cup brown sugar
1/2 tsp salt
1/2 tsp ground cinnamon
1 large egg
1 cup all purpose flour
1/4 cup breadcrumbs made from cinnamon bread  (cut into bite size pieces and toast in oven until dry.  Once toasted, whirl in blender to make crumbs.)
1 tbsp baking powder
1/4 cup Pancetta, small dice

Cinnamon Whipped Cream:
1 cup heavy whipping cream
1 tbsp + 1 tsp powdered sugar
1/4 tsp ground cinnamon
1 tsp vanilla

To make whipped cream:
Add heavy whipping cream to a medium size mixing bowl and begin to incorporate air into the cream using hand mixer on low.  Increase speed and once thickened slightly, add sugar, cinnamon and vanilla.
Continue to blend until stiff peaks form, cover bowl with plastic wrap and keep refrigerated until ready to serve.

To make batter:
Blend pumpkin and butter until smooth and then add sugar, salt & cinnamon.  With a whisk, blend in egg until fully incorporated. Slowly whisk flour and breadcrumbs into batter.  Using a spoon, fold Pancetta into mix.

To fry:
In a large, heavy bottomed pan, add 50/50 canola, vegetable oil blend until at least 1" deep.  Heat the oil to 325°.  Working in batches, use a small cookie scoop to drop rounded spoonfuls of batter into the oil.  The fritters will start to float when they need to be flipped. Cook approximately 1 minute per side or until golden brown.  Keep warm in oven while working through remaining batter.  Serve warm with Cinnamon Whip Cream and a sprinkle of powdered sugar.

Makes approximately 20-25 fritters. 

*Fresh roasted pumpkin is best, roast in oven with a sprinkle of 1 tbsp brown sugar at 350° for about 20-25 minutes or until soft to touch.  If fresh pumpkin is not available, substitute with canned.

Monday, October 25, 2010

Deal of the Week - Williams Sonoma Festive Cornucopa Bundt Pan

I had to post this one because it is a good deal for a seasonal kitchen item and the cake would make a fantastic centerpiece for Thanksgiving.  Here's the description and the deal:


Grapes, gourds and corn cobs spill out of our cornucopia basket, a timeless symbol of the harvest. Even children will find these fruits and vegetables irresistible, as they’re actually buttery cake that’s baked in our autumnal variation on the classic Bundt pan.

    * The pan’s intricate design means a simple dusting of confectioners’ sugar is all the decoration the cake needs.
    * Crafted of durable, heavy cast-aluminum for efficient, even baking.
    * Premium nonstick interior ensures perfect detail, effortless release and cleanup.
    * Made in the USA by NordicWare, renowned creators of the original Bundt pan and a family-owned company since 1946.
    * A Williams-Sonoma exclusive.


Normally $34.00, on sale for $19.99!

Click here for the website listing.  I think I'll use it for our rum cake...

Thursday, October 21, 2010

Pumpkin Ravioli with Alfredo Sauce

Pumpkin Everywhere!   If you've never cooked with fresh pumpkin, it is time to try it.  I've seen an abundance of sugar pie pumpkins this year so I grabbed one and turned it into two successful recipes to date.  One of which was enjoyed for last night's supper club: Pumpkin Ravioli with Alfredo sauce. 

To start, you'll need to slice the pumpkin into manageable wedges.  Scrape out the pumpkin seeds and don't even think of tossing them, they make a delicious treat all on their own.  In an oven at 350°, roast the pumpkin wedges with a sprinkle of brown sugar for about 15-20 minutes or until brown and slightly caramelized on top. Let it cool so you can handle easily.

Here's the recipe for the ravioli filling:
2 cups pumpkin
1/4-1/2 cup grated Parmesan cheese
1/4 cup Panko breadcrumbs
1 egg (lightly beaten)
1/4 cup Pancetta diced & sautéed until browned
1/4 tsp cinnamon
Pinch of nutmeg
salt and pepper to taste

All ingredients go into a mixing bowl and are combined with a spoon or spatula until fully incorporated.

Now the fun part - stuffing the wrappers! Usually near the refrigerated soy products in your grocery store, you can find wonton wrappers.  I used the brand pictured below last night and they were just the right thickness.  On a clean surface, layout individual wonton wrappers in a row.  Scoop a small amount (about 1/2 tsp to full tsp), onto the center of each wrapper (a small cookie dough scoop works really well for this step).  Next, wet your pointer finger in a bit of water and trace you finger over the outer edge of the entire wrapper. Fold the wrapper over from corner to corner to form a triangle, the water will act as a glue. Push down slightly around the filling to try and remove as much air as possible and press the edges to form a seal.  Finally, bring the bottom two corners together to form an envelop shaped ravioli.  Transfer to a cookie sheet for holding.

Once all ravioli are stuffed (this recipe makes 48 ravioli with a little filling leftover), they can either be transferred to the freezer or cooked immediately in salted boiling water (ravioli will float when cooked through).  If freezing, freeze in a single layer on the cookie sheet so that the ravioli do not touch. This will prevent them from sticking together.  Once frozen, they can be transferred to a plastic ziploc for freezer storage.


Alfredo Sauce:
1/2 stick unsalted butter
1 cup heavy whipping cream
1 & 1/4 cups Parmesan-Reggiano
Salt & Pepper
Parsley to finish

In a medium sauce pan, melt butter over low to medium heat.  Add cream and combine with whisk.  Let simmer for about 3 minutes and add cheese, whisking to blend.  Keep temperature on low and when ready to serve, add salt and pepper to taste and chopped parsley. 

Unfortunately, my pictures were deleted but trust me when I say that this is a seasonal favorite that will be a big hit!

Tuesday, October 19, 2010

Pork Roast with Lemon Sage Sauce and Candied Carrots


Today's recipe is a throw back to my childhood, when parents and grandparents alike fought to get kids to eat their vegetables.  This recipe, along with the 'carrots help you see at night' story, definitely got us into veggies.   So, I picked up a small bunch of baby carrots from Fertile Crescent Farm and paired the side dish with roast pork finished with citrus/herb sauce.  Here's the fix:
Candied Carrots:
1 bunch of baby carrots
2 tbsp butter
2 tbsp brown sugar
salt & pepper
canola oil
Simple, simple, simple. Preheat the oven to 350°.  Chop stems off carrots, rinse and peel. In a sauté pan over medium-lo heat, add a drizzle of canola oil and the butter to melt.  Add carrots and toss to coat.  Cook for approximately 2-3 minutes and then add brown sugar, pinch of salt and a crack of black pepper.  Toss to coat and then transfer to a non-stick roasting pan and place in oven for about 10 minutes or until a nice caramelization forms.  Flip once to get all sides evenly browned.  Serve warm.
Pork Roast:
1 1-1.5 lb pork roast
1/4 cup extra virgin olive oil
Zest from 1/2 lemon
Juice from 1/2 lemon (or whole if it does not render enough liquid)
1 tsp capers (with liquid)
4-6 leaves fresh sage chopped
bay leaf
salt & pepper
Start by brining the roast which will make the meat moist and flavorful.  In a large ziploc, add olive oil, lemon zest, juice and sliced lemon, capers, chopped sage and bay leaf.  Towel dry the pork roast and season with salt and pepper.  Transfer the roast to ziploc, add about 1/2 tbsp more salt, seal tightly and toss the mixture, massaging the liquid into the roast. Make sure all liquid is equally distributed around the roast and place bag into the refrigerator for 20 minutes (the acid from the lemon will start to 'cook' the meat so it should be removed from the brine within 30 minutes at the most).  Remove from the refrigerator, pull the roast out, pat dry and discard the liquid.  Let the meat come to room temperature. 
Warm a cast-iron skillet over medium heat with about 1 tbsp olive oil.  Sear the roast on all sides, about 2 minutes per side. Next, transfer the skillet with roast into an oven at 350° and roast for 15-20 minutes.  The roast should rest under an aluminum foil tent for at least 5 minutes before slicing.  Meat should come out juicy and slightly pink in the middle.  For safety, internal temperature should be reach 160°.
I finished the pork with a super simple lemon sage sauce...combine 2 tbsp 2% plain Greek yogurt, 1 tsp olive oil mayonnaise, zest from 1/2 lemon, 1 tsp lemon juice and 3 leaves fresh chopped sage.  Season with a little salt and spoon over sliced roast! 


Monday, October 18, 2010

Introducing Deal of the Week!

There's a new tab in town!  I've included a 'Deal of the Week' tab that will showcase some amazing kitchen deals that I find while surfing the interweb.  I'll try and keep it to brands I use and also let you know if it's something I've mentioned in a previous post.  I think it's safe to say that all the world loves a deal so happy shopping and please sharing your findings, too! I hope these links are helpful.

This week's deal o' the week:


Crate & Barrel is hosting their annual cutlery sale and, if you've shopped for kitchen knives before, you know 30% off is a huge deal!  Check out the great selection they have and if you aren't sure what you need, their sales staff is very well-versed in the 'cutting edge' technology of all things sharp and slicey.

Thursday, October 7, 2010

Roast Chicken with Herb Butter and White Wine

I like posting recipes like this one because I think our generation is scared of the classics.  Maybe because we grew up eating full meals first pulled from a freezer and then 'prepared' in a microwave.  Maybe it's because we are busy. Maybe it's because we don't think we can cook them as well as our mothers or grandmothers.  Well, I can't argue with that last point - meals remembered are always better than meals self-prepared -however, I can say that it's not as hard as we make it out to be.  And truthfully, though it takes a while to get to the finish line on this one, the bulk of the time doesn't include you being anywhere near the kitchen.  The bird sits in the oven for 1.5 to 2 hours so really you have time to sit down, relax and enjoy some delicious smells wafting through the air while your dinner cooks away without your constant attention.

Roast Chicken with Herb Butter & White Wine

1 oven roaster
1 stick butter at room temperature
fresh herbs - rosemary, thyme, oregano, sage
olive oil
white wine (one you would drink)
root vegetables - parsnips, carrots, potatoes
celery
onions
salt & pepper
Parsnips add a touch of sweetness without breaking down like sweet potatoes.

Preheat the oven to 350°.  Start by taking the chicken out of the fridge and taking the chill off.  It's important to remove whatever innards are left in the bird and to thoroughly pat it dry using some paper towels. The bird should be fully seasoned with salt and pepper all over, even inside the cavity.  Don't be shy with the seasoning.  While the bird is coming up to room temp, strip the herbs from the stems and rough chop them into small pieces (reserve the stems, they can go into the roasting pan for flavor).  Add the herb mixture and a shake of salt and pepper to the softened butter until it is well blended. 

Starting with the breast side of the chicken, use your fingers to loosen the skin by running your fingers in between the meat and the skin.  This 'pocket' will hold a majority of the herb butter.  Push the butter mixture under the skin and massage into the chicken and do the same on the reverse side, spreading the butter all over the bird and under the skin where possible.  Be sure to also get some of the butter into the cavity of the bird.  Next, drizzle the breast side of the chicken with olive oil and lay it breast side down into a roasting pan. Cook this way for 15 minutes.

Sebastiani Roussanne - great with roasted vegetables
While the breast side of the chicken gets nice and toasty in the oven, cut the vegetables into bite size pieces and all roughly the same size. Season with salt and pepper and a drizzle of olive oil.

When the buzzer rings at 15 minutes, pull the chicken out of the pan and deglaze the bottom with about 1/2 cup to cup of white wine (while pouring, stir the wine and scrap the pan with a wooden spoon to release the brown bits from the bottom).  Transfer the veggies to the pan and add the chicken back in, either directly on top of the vegetables or on a roasting tray.  Depending on the size of the bird, it should remain in the oven for approximately 1.25 to 2 hours (follow timing instructions on packaging) or until juices run clear when a knife is inserted between the thigh and chicken breast. For added deliciousness, dip a basting brush in the wine/butter mixture formed at the bottom of the pan and baste the chicken 2-3 times during cooking process.  Also, allow the chicken to rest under foil or a paper grocery bag for 10-15 minutes before serving.

Too hungry to stop for a photo!
Tasty, tasty!  And if it's just two of you like it is for us, you'll have plenty of leftovers for the next night. Do you have a George Foreman grill? Try chicken paninis with fig spread and brie cheese. Yum!

Wednesday, October 6, 2010

Maker's Mark Apple Tart

Comfort, comfort, comfort.  Is there anyone that doesn't like to hunker down, throw a few logs on the fire and smell apples and cinnamon in the air?  If so, I'll challenge them to try this combination and defy the odds of a smile making its way to the corners of their mouth.

I've mentioned a few times before that the apple pie has gotten the best of me.  Not one to take defeat lightly, I went back to the drawing board and this time came up with a winning combination of flavor and texture.  I visited Victory Farms again and picked up a container of Smokehouse apples in the hopes of making this go-round an apple treat to be proud of. They've brought in a variety of Henley's Orchard Apples and as was told to me, Smokehouse make great baking apples because they are middle of the road - not too sweet, not too tart.  Here's the recipe I created:

1 store bought pie crust
4-5 smokehouse apples
2 tbsp Maker's Mark bourbon
3/4 cup brown sugar
3 tbsp all purpose flour
1/3 tsp cinnamon
1/3 tsp nutmeg
1/3 tsp allspice

Preheat the oven to 450° and transfer the pie crust to buttered tart pan.  Lightly press the crust into the pan, try not to stretch the dough since it will just shrink back to it's original shape when baked.  Press the overlap against the pan edge and pull off, reserve for decoration. Fork the bottom of the crust to prevent it from bubbling up and bake for 5-7 minutes.
For the filling, start by mixing the bourbon, brown sugar, 2 tbsp flour (reserve 1 for another step), cinnamon, nutmeg, allspice.  It should give you a moist but lumpy mixture.  Next, slice the apples.  I left the skins on for this since it's a rustic kind-of tart and well, I am sometimes lazy when it comes to these types of things. The easiest way to get the right slice, is to cut each apple in 1/2, use a melon baller and extract the core and stems.  Next, use a mandolin to get thin, uniform slices.  Pile the slices into the bourbon mixture and mix them up, making sure each slice is coated.  Once the apples have been coated, sprinkle the last tbsp of flour over the slices and use a spoon to mix everything up again.  At this point, there should be a good amount of liquid in the bottom of the bowl which can be discarded or drizzled it over the finished product.


Once the pie crust has finished it's first bake, layer the apple slices from the middle out until they are just over the top of the crust .  Using leftover pie crust, I made a little flourish for the top...do whatcha like. Bake the tart for 20-25 minutes, let cool for 10 minutes and enjoy!
My husband and I had a discussion that went something like this: Me, 'The timer buzzing means pull the item out of the oven.' Husband, 'It buzzed at me, I turned it off.'  No matter...it was still delicious.

Monday, October 4, 2010

And the winner of the Neela Bags Market Totes is....

Erika Fiest!  As a follower of Pantry2Plate on Facebook, your name was randomly selected as the winner of these awesome totes...we know you'll enjoy them! Please email us at pantry2plate@gmail.com to let us know where they should be sent.  Thanks again for being a fan!

Friday, October 1, 2010

Smothered, Stuffed and Steamed Chicken Breast over Spaghetti Squash

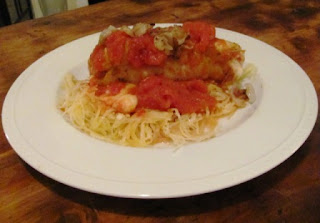
Fresh basil on top would have been great but it was pouring rain, I wasn't headed to the garden!
The rain was coming down in sheets last night so there was no chance of us venturing out.  We hunkered down and went for a new comfort food for dinner, stuffed chicken breasts.  This time we chose proscuitto and mozzarella for a salty bite and then smothered the rolled chicken in a sweet plum tomato sauce and topped it all off with caramelized shallots.  The best part of this dish is that it's a one pot wonder.  A few steps to get to the prize but they are all easy and fun. 


1 lb boneless, skinless chicken breasts
1/4 lb thin sliced proscuitto
4-6 oz fresh mozzarella, sliced
4 shallots, thinly sliced
1 28 oz can peeled & steamed plum tomatoes with basil and in juice
white wine
olive oil
2 tbsp butter
1/4 tsp fennel seeds
scant 1/4 tsp red pepper flakes
1/2 tsp garlic powder
1 spaghetti squash, roasted and shredded
parmesan cheese for topping
salt & pepper

Preheat oven to 350° for both roasting squash and cooking chicken. The squash should be halved, scraped free of seeds, drizzled with olive oil and sprinkled with salt and pepper.  It goes into the oven cut sides up and roasts for about 30-40 minutes until soft.

In a dutch oven or heavy bottomed pan with lid that can be transferred to the oven, add a whirl of olive oil and 1 tbsp butter over med-hi heat.  Toss in thinly sliced shallots and let reduce until a caramel color has developed, season with a touch of salt and pepper.  Be sure to move the onions around with a spoon so that they all get coated with the butter and have a chance to cook evenly.

Depending on size of chicken breasts, either pound entire piece flat or slice in half vertically and pound the two pieces flat.  Let out that aggression from the day!  Get a bacteria resistant cutting board out and place the chicken breast on top. Lay plastic wrap over the chicken and use a mallet to flatten, pushing out from the center of the meat when you strike.

Season both sides of chicken with salt and pepper and lay 2 pieces of proscuitto and 2 slices of mozzarella over the middle of each chicken breast.  From top to bottom, roll the breast onto itself, tucking in the stuffing and securing with toothpicks.  Try to secure the ends by weaving a toothpick in and out of the meat so as to keep as much of the cheese in the roll as possible.

Once the shallots have finished caramelizing, transfer to a plate to reserve.  Add an additional tbsp of butter to the same pan and add the rolled chicken breasts to brown on all sides.  The meat will release from the pot when a good color has formed...let it do it's thing rather than moving it around constantly.  The idea of this step is to develop flavor, not cook the meat entirely so a 2-3 minutes on each side should do the trick.  Once browned on all sides, transfer to a plate to open the pot up for the sauce. 

First hit the pan with about 1/4 to 1/2 cup white wine and watch it sizzle!  Get out a wooden spoon and scrap at the bottom to loosen all the flavor.  Once the pan is sufficiently deglazed, add the canned tomatoes, fennel seed, red pepper flakes & garlic powder.  Use your wooden spoon to break up the tomatoes into large chunks and to stir the sauce to combine. Season with salt and pepper as needed and let simmer for a few minutes to bring the flavors together.  Add the chicken breasts (and any liquid on the plate) back to the sauce mixture which should cover about 2/3's of the chicken. Add the shallots to each of the chicken breasts, top  the pot with a lid and transfer to the oven to cook for 10-15 minutes.

If you're good, it'll come out a few minutes before the squash is done and it can simmer away on the stove (not over heat) while you shred the veggie into spaghetti like threads.  Just use a fork to work the squash out of it's skin, top with a drizzle of olive oil, parmesan cheese and a little pepper.  Next, top the squash with 1 chicken roll with the shallots on top and a generous helping of the tomato sauce. 

Get it while it's hot, this one is soul warming and you'll be fighting for seconds!