Amazon's Amazing Kitchen Deals brought to you by Pantry2Plate

Showing posts with label eating. Show all posts
Showing posts with label eating. Show all posts
Tuesday, November 23, 2010
Deal of the Week - About a Million of 'Em!
There are so many amazing deals this week due to the holiday push. Amazon has got deals like you wouldn't believe...click the 'Amazon's Amazing Kitchen Deals' link below and you will see all the great Kitchen deals they have in store - Up to 40% off popular small appliances, knives and kitchen tools. I promise you will not be disappointed.
Amazon's Amazing Kitchen Deals brought to you by Pantry2Plate
Amazon's Amazing Kitchen Deals brought to you by Pantry2Plate
Friday, October 1, 2010
Smothered, Stuffed and Steamed Chicken Breast over Spaghetti Squash
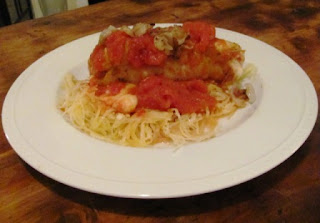 |
| Fresh basil on top would have been great but it was pouring rain, I wasn't headed to the garden! |
1 lb boneless, skinless chicken breasts
1/4 lb thin sliced proscuitto
4-6 oz fresh mozzarella, sliced
4 shallots, thinly sliced
1 28 oz can peeled & steamed plum tomatoes with basil and in juice
white wine
olive oil
2 tbsp butter
1/4 tsp fennel seeds
scant 1/4 tsp red pepper flakes
1/2 tsp garlic powder
1 spaghetti squash, roasted and shredded
parmesan cheese for topping
salt & pepper
Preheat oven to 350° for both roasting squash and cooking chicken. The squash should be halved, scraped free of seeds, drizzled with olive oil and sprinkled with salt and pepper. It goes into the oven cut sides up and roasts for about 30-40 minutes until soft.
In a dutch oven
Depending on size of chicken breasts, either pound entire piece flat or slice in half vertically and pound the two pieces flat. Let out that aggression from the day! Get a bacteria resistant cutting board
Season both sides of chicken with salt and pepper and lay 2 pieces of proscuitto and 2 slices of mozzarella over the middle of each chicken breast. From top to bottom, roll the breast onto itself, tucking in the stuffing and securing with toothpicks. Try to secure the ends by weaving a toothpick in and out of the meat so as to keep as much of the cheese in the roll as possible.
Once the shallots have finished caramelizing, transfer to a plate to reserve. Add an additional tbsp of butter to the same pan and add the rolled chicken breasts to brown on all sides. The meat will release from the pot when a good color has formed...let it do it's thing rather than moving it around constantly. The idea of this step is to develop flavor, not cook the meat entirely so a 2-3 minutes on each side should do the trick. Once browned on all sides, transfer to a plate to open the pot up for the sauce.
First hit the pan with about 1/4 to 1/2 cup white wine and watch it sizzle! Get out a wooden spoon and scrap at the bottom to loosen all the flavor. Once the pan is sufficiently deglazed, add the canned tomatoes, fennel seed, red pepper flakes & garlic powder. Use your wooden spoon to break up the tomatoes into large chunks and to stir the sauce to combine. Season with salt and pepper as needed and let simmer for a few minutes to bring the flavors together. Add the chicken breasts (and any liquid on the plate) back to the sauce mixture which should cover about 2/3's of the chicken. Add the shallots to each of the chicken breasts, top the pot with a lid and transfer to the oven to cook for 10-15 minutes.
If you're good, it'll come out a few minutes before the squash is done and it can simmer away on the stove (not over heat) while you shred the veggie into spaghetti like threads. Just use a fork to work the squash out of it's skin, top with a drizzle of olive oil, parmesan cheese and a little pepper. Next, top the squash with 1 chicken roll with the shallots on top and a generous helping of the tomato sauce.
Get it while it's hot, this one is soul warming and you'll be fighting for seconds!
Tuesday, September 28, 2010
Butternut Squash and Ricotta Gnocchi
This past Saturday I picked up a butternut squash from Victory Farms and knew exactly what I wanted to make...warm, fluffy pillows of gnocchi, full of flavor and perfect for a rainy Fall night. This recipe requires a little prep time but is worth it in the end. Even though there is flour in the recipe, it's especially great for those craving pasta but watching the flour intake since the bulk of the gnocchi is made up of ricotta cheese and butternut squash. Here's the fix:
1 butternut squash, cubed
1 16 oz. tub of part skim ricotta cheese
2 tbsp grated Parmesan cheese
1/4 tsp nutmeg (plus more for roasting the squash)
2 large eggs lightly beaten
1/2 - 1 cup and more for rolling gnocchi
salt & pepper
Start by roasting the squash. For those of you that haven't worked with it before, I like to peel it first and then cut it in 1/2 lengthwise. It has seeds just like a pumpkin that need to come out so you can either spoon them out or cut around them. Cut into equal size cubes, sprinkle with a touch of nutmeg, S & P and a drizzle of olive oil. Roast in the oven at 425° for about 15 minutes, flipping once or twice to help get the caramel color on all sides. You'll want it a little brown on the edges for great flavor so go longer if necessary.

Once out of the oven, transfer to paper towels to soak out some of the oil. The squash should be as dry as possible before adding to the dough. After drying, transfer to a food processor or use a potato masher
 to blend the squash until smooth. Place the mixture in the fridge to allow to cool before beginning on dough.
The ricotta will also need to be prepped which can be done the night before by wrapping in a cheesecloth and suspending over a bowl to properly drain or, if you are like me, the 'super-quick because don't always think ahead' way - wrapped in a clean, thin kitchen towel
 and squeezed with your hands until every last drop of liquid runs out. The ricotta needs to be as dry as possible to form a dough that will hold its shape.
In a large mixing bowl , add the 'dried' ricotta, egg, parm, nutmeg and blend together until smooth. Next add about 3/4 cup of the roasted squash mixture and fold into dough. Add salt & pepper for proper seasoning. This will loosen it up considerably but the flour will help to bind the dough together again. Start with 1/4 cup mixed in and slowly add more until the dough can hold it's shape.
At this point, the dough should be refrigerated for about an hour. Prep a baking sheet with a healthy amount of flour distributed over the pan and a separate pan lined with parchment paper. Once the dough comes out of the refrigerator, form into dough balls by rolling in your hands or roll into a small tube from which to pinch off about one inch sized pieces in the form of traditional gnocchi. Either shape will then need to be 'rolled' in the flour, sifted of any excess by tossing back and forth in hands and then transferred to the baking sheet lined with paper. Once formed, the gnocchi will then go back into the refrigerator for at least another hour or longer.
To cook, bring up a pot of salted boiling water and carefully drop the individual pieces into the water. They will cook for approximately 3-5 minutes and are done when they float to the top. The gnocchi should be scooped out with a mesh strainer and transferred to a paper towel before plating with sauce.
Speaking of sauce...this one goes beautifully with the butternut squash: 1/2 stick unsalted butter browned (over low-medium heat) in a sauté pan with ribbons of sage leaves and a small dice of a cured meat like Pancetta (season with salt and pepper to taste). Watch the edge of the pan for browning and promptly remove from heat. Spoon over gnocchi and top with grated Parmesan.
Would love to show you a picture of the finished product but our eyes and stomachs were focused in on the feast and there was no stopping 'em!
1 butternut squash, cubed
1 16 oz. tub of part skim ricotta cheese
2 tbsp grated Parmesan cheese
1/4 tsp nutmeg (plus more for roasting the squash)
2 large eggs lightly beaten
1/2 - 1 cup and more for rolling gnocchi
salt & pepper
Start by roasting the squash. For those of you that haven't worked with it before, I like to peel

Once out of the oven, transfer to paper towels to soak out some of the oil. The squash should be as dry as possible before adding to the dough. After drying, transfer to a food processor
The ricotta will also need to be prepped which can be done the night before by wrapping in a cheesecloth
In a large mixing bowl
At this point, the dough should be refrigerated for about an hour. Prep a baking sheet
To cook, bring up a pot of salted boiling water and carefully drop the individual pieces into the water. They will cook for approximately 3-5 minutes and are done when they float to the top. The gnocchi should be scooped out with a mesh strainer and transferred to a paper towel before plating with sauce.
Speaking of sauce...this one goes beautifully with the butternut squash: 1/2 stick unsalted butter browned (over low-medium heat) in a sauté pan
Would love to show you a picture of the finished product but our eyes and stomachs were focused in on the feast and there was no stopping 'em!
Thursday, September 23, 2010
Neela Bags and Market Totes - Review & Giveaway!
It seems apparent that the world is moving to all things 'green'. For those of you who've had some trouble thinking of easy ways to get with the movement, and even for those of you who are heading the movement, I've got a great product to share. A year ago, my sister-in-law treated me to a birthday lunch and gave me a gift that I've used almost everyday since. She presented me with this little bag, decorated in a funky, modern, giraffe print and bordered in hot pink. Inside were 5 more neatly folded bags, the only difference being when you open the inside bags up, they unfold into extra large carrying totes! Neela Bags have made a world of difference for me at the grocery store. For one, I was always the person to forget my reusable totes at home, leaving them scattered all over my pantry and storage areas. Neela Bags fold and roll back into the same condensed shape, secure with velcro, and get tucked right back into the matching bag. The fabric is soft enough to fold easily but sturdy enough to a) hold a billion groceries and b) keep the original folding creases so that it practically folds itself when you are done. I fold them one by one while putting away the groceries and place them back in the carrying bag. Then the carrying bag goes on my front door handle so that I remember to take it back to the car for the next use. They look so cool, I don't mind having them as added decoration for a night!
So, in addition to the neatness factor, they are strong, strong, strong! I can't emphasize this enough. I've had a gallon of milk, a couple of bottles of wine and various other groceries all in the same bag and I have never worried about the bottom dropping out. The straps are long enough to make it easy to carry multiple bags at a time and 5 bags, plus the little guy for smaller items, is more than plenty for one run to the store. I use them in other capacities, too - they are great for the farmer's market, toting anything to and from the car, lunch carriers, you name it, they work and look good working, too!
So, I wanted to share here because I have had so many people asking me about the bags and how to get them. I also think that using reusable, recyclable bags instead of plastic or paper bags is one easy way we can all help. And if we are gonna turn this world green, let's work in some style while we are at it! Click here to see all that Neela has to offer, you won't be disappointed.
But wait...there's more! To show you just how much we love this product, we are giving away one Market Pack to a lucky reader! Sign up to become a follower of the blog by clicking on the 'Follow with Google Friend Connect' button and entering your information. You'll see your online handle show up as a follower to the blog and get updates in your blog feed when a new post is available. Once you are a follower, you will be automatically entered into the drawing (current followers are also eligible). Or, become a Facebook fan by hitting the 'like' button on our page. Either way you'll be entered! Contest ends October 1st at 5 p.m. EST.
Let's see your love for Mother Earth and all Neela Products! And be sure to tell us what changes you are making in the kitchen to 'go green'...
 |
| Neela Market Pack in Circles Kelly Green |
So, in addition to the neatness factor, they are strong, strong, strong! I can't emphasize this enough. I've had a gallon of milk, a couple of bottles of wine and various other groceries all in the same bag and I have never worried about the bottom dropping out. The straps are long enough to make it easy to carry multiple bags at a time and 5 bags, plus the little guy for smaller items, is more than plenty for one run to the store. I use them in other capacities, too - they are great for the farmer's market, toting anything to and from the car, lunch carriers, you name it, they work and look good working, too!
So, I wanted to share here because I have had so many people asking me about the bags and how to get them. I also think that using reusable, recyclable bags instead of plastic or paper bags is one easy way we can all help. And if we are gonna turn this world green, let's work in some style while we are at it! Click here to see all that Neela has to offer, you won't be disappointed.
But wait...there's more! To show you just how much we love this product, we are giving away one Market Pack to a lucky reader! Sign up to become a follower of the blog by clicking on the 'Follow with Google Friend Connect' button and entering your information. You'll see your online handle show up as a follower to the blog and get updates in your blog feed when a new post is available. Once you are a follower, you will be automatically entered into the drawing (current followers are also eligible). Or, become a Facebook fan by hitting the 'like' button on our page. Either way you'll be entered! Contest ends October 1st at 5 p.m. EST.
Let's see your love for Mother Earth and all Neela Products! And be sure to tell us what changes you are making in the kitchen to 'go green'...
Tuesday, September 21, 2010
Football Party Mac & Cheese
 |
| Football Mac & Cheese |
If you have a guy in your house or kids, this one is a winner. It's a go-to meal because chances are you have the ingredients in your kitchen already, especially if you love cheese the way we do in my house. I call it Football Party Mac & Cheese because it's a manly type meal and perfect for a few friends crowded around a TV rooting for their favorite team. Check it out:
1 lb whole wheat rotini pasta
5 turkey hot dogs
7 tbsp unsalted butter
6 tbsp all purpose flour
4 cups 2% milk
2 tsp of dried mustard
1/8-1/4 tsp cayenne pepper
1/4 tsp salt
fresh black ground pepper
10 ounces shredded Wisconsin white cheddar
4 ounces shredded extra sharp cheddar
1 cup Italian style breaded crumbs
1/4 cup Parmesan cheese
Preheat oven to 350°. Bring salted water to a boil for pasta and cook to al denté based on package instructions (usually 7-9 minutes). If hot dogs are frozen, throw into boiling water for the last minute. In heavy bottomed sauce pan, melt 6 tbsp butter over low heat and whisk in flour until fully incorporated. Stream in milk, continuing to whisk and raise temp to medium to medium high. Bring milk mixture to a boil, whisking along the way to prevent milk from burning. Cut back heat to low to low-medium and add in mustard, cayenne, salt and pepper, whisking occasionally until mixture thickens. Adjust S & P if necessary.
Drain pasta thoroughly and cut hot dogs into small bite sized pieces. Transfer to a large mixing bowl and stir in milk mixture, white cheddar and sharp cheddar.
Grease a shallow baking dish with butter and transfer all to dish. Mix together bread crumbs and Parmesan and spread over the top of pasta. Cut up remaining tbsp of butter and distribute pieces over breadcrumbs. Bake for 20-25 minutes, comes out bubbly and golden. Serve it up alongside a mixed greens salad with a mustard vinaigrette to compliment the flavors in the mac & cheese.
 |
| Dig IN! |

Monday, September 20, 2010
Honey & Cinnamon Pear Granola

3 cups oats
1 cup slivered almonds
1/2 cup sesame seeds
1 cup chopped dried dates
1 cup golden raisins
4 tbsp whipped honey
3 tbsp pear jam (made with cinnamon)
3 tbsp butter
1/4 tsp salt
1/4 tsp cinnamon
Preheat oven to 350° and start by combining the oats, almonds and sesame seeds in a large mixing bowl. I like to rough chop the almonds and here’s a tip, spread them in a thin layer on your chopping board rather than a pile and keep your knife tip on the down while running through the nuts. It’ll keep your kitchen free of little almond missiles. Next, over low heat, combine the honey, jam and butter until smooth. Remove from heat and let cool. Transfer to mixing bowl and stir until oats are coated thoroughly.
 In a non-stick jelly roll pan
Wednesday, September 15, 2010
Fettucini Pie

1 bundle Bombolini Roasted Red Pepper Fettucini noodles*
1 tbsp olive oil
1 tbsp butter
½ medium white onion, diced
1 clove garlic
1 package frozen spinach
10 eggs
3 tbsp whole milk
1 cup part skim mozzarella cheese, shredded
1 thick cut slice (about 2”) slice of Norwood Cottage Red Pepper Flake and Parmesan bread, cubed*
2 tbsp parmesan/asiago/reggiano blend
Salt and pepper
Preheat the oven to 400° and start by slightly cooking the pasta. Since it’s fresh it should only take a little over 1 minute in salted boiling water
In a mixing bowl


*For those of you not in the area, a prepackaged fettucini noodle
Monday, September 6, 2010
Market Pie - Tomato and Goat Cheese Pizza
We saved this week's Farmer's Market treats for our last possible holiday weekend hurrah, Labor Day dinner. After a few days of grill favorites, we wanted to turn to another staple - pizza. Fortunately, our market supplies us with wonderful products outside of the produce stand. We picked up prebaked pizza dough from the Countryside Bakery's table. Each week they have a great deal on two pizza rounds for only $6. Buying it prebaked saves time and a mess to clean up. We also wanted to savor those heirloom tomatoes a little longer, so we stopped by Amy's Garden and got a basket of varietals. The last stop for this go-round was at a favorite, Sullivan's Pond Farm, to pick up fresh made, straight-from-the-farm, tangy goat cheese. We've sampled most they have to offer but since I was planning to combine this with other flavors, I went with a plain Isabel-Moonshine chevrette wrapped in corn whiskey macerated corn husks. Their cheese never disappoints and can be used in a number of different ways, aside from just being enjoyed own its own. Delicious!

We took these ingredients and put them together for one half of the pizza and for the other half, we used a store bought alfredo and topped with grilled chicken. Here's how we put together the Farmer's Market pizza (measurements below calculated for a full pizza):
1 Countryside Bakery pizza round
3 tbsp pesto (leftover from last weekend's recipe)
8-10 Roma or cherry tomatoes depending on size
3-4 tbsp Sullivan's Pond goat cheese
Since the dough is prebaked, the ingredients go right on the pizza dough and it bakes in half the time. Start with a layer of pesto spread thinly over the entire round, add sliced tomatoes and top with crumbled goat cheese. Bake at 375° for about 8 minutes and if baking in a standard oven, hit it with a LO broil at the end for about 3 minutes to really get the edges brown and the cheese smooth. Serve it warm and watch out, those tomatoes hold some heat! I burned the roof of my mouth with the first bite, but it didn't stop me from devouring the entire half!

These are market vendors we will definitely be visiting again for quick, easy, tasty weeknight meals.
Tuesday, August 31, 2010
Celebrate Good Times! Pantry2Plate WINS Cuisinart's Get Cooking! Contest
 |
| Polenta Fries with Parmesan Dipping Sauce and Basil Oil |
I am more than thrilled to announce that Pantry2Plate has won the latest series of Cuisinart's Get Cooking! Contest. This contest makes it easy to get excited about being in the kitchen and the winning recipe truly came from one of the greatest pleasures of cooking...sharing good food and great times with remarkable friends. The feedback from the Cuisinart Chefs is on point and something I've heard from another faithful reader (Squints, you call 'em like you see 'em!), so I will work on being a bit more descriptive in my posts. How about the rest of you? Anything else you would like to see? Thanks for your support...I am grinning from ear-to-ear!
Check out the link below for what Cuisinart Chefs had to say:
http://www.cuisinart.com/recipes/get-cooking-contest/winners.html
The winning recipe post can be found in my archives and linked below:
http://pantry2plate.blogspot.com/2010/06/polenta-fries-with-basil-oil-and.html
Monday, August 30, 2010
Spaghetti Squash with Pesto
We found this weekend that the coming of fall is palpable. What it means for our kitchen is scooping up the last of our favorite summer treats and transitioning into a new fall lineup. I started to think ahead to how I can preserve the flavors of summer and enjoy them for a few months longer. So in this week’s ‘Saturday’s Basket’, greens abound! Our trip to the South of James Farmer’s Market always starts with a large coffee from Blanchard’s to help get the creative juices flowing and help us sort through what tastes we want for the week. After we started to wake up, we picked up arugula & green beans from Victory Farms and a squash and basil bunch from Pleitez Produce. The arugula and basil blended together make a healthy portion of pesto and pesto makes for a great freezer food. Once blended, portion the sauce into ice trays and freeze. Pop out individual cubes whenever you are craving that summer sweetness. Pesto paired with spaghetti squash was on plate for a great homemade Sunday dinner. It’s an easy side dish and makes a great pasta substitute for those curbing the carbs. Here’s the fix:
1 spaghetti squash
Olive oil
Salt & pepper
Preheat the oven to 425°. Slice the squash in half and scoop out the strings and seeds (as you would for a pumpkin). Place the squash on a baking dish , slice side up and drizzle olive oil over, sprinkle with salt and pepper. That’s it! Roast the squash until the fibers start to break down and you can easily shred the ‘meat’ with a fork. It should fall right out of the shell when scraped. I’ve found the easiest way to scrape the veggie out is by leaving it in the dish and holding one side with my kitchen tongs
 . Shred right in the shell and then transfer to a serving bowl.
Basil and Arugula Pesto:
2 handfuls of fresh basil leaves
1 handful of fresh baby arugula
¼ cup walnuts
¼ cup parmesan cheese
Olive oil
Pinch of salt
A few cracks of fresh ground black pepper
In a food processor , add the greens, nuts and cheese. While the processor is on, stream in olive oil until the pesto reaches a creamy, loose consistency. Pesto is a preference food meaning, some like it chunky, some like it loose. Some like it with a lot of cheese, some with a little. It is a versatile sauce and dip and taste testing is always necessary. On the last whirl around the processor, add a little salt (go light, salt is already a big contributor in the cheese so seasoning began with that addition) and a few cracks of pepper to taste. The arugula will also help to give it a little bite so be sure to taste test as you go so as not to overdo the pepper.
Bring the two together by topping the roasted, hot spaghetti squash with a dollop of pesto. Turn to coat and serve warm. It’s a nice nod to summer flavors with a hint of what’s coming for fall.
1 spaghetti squash
Olive oil
Salt & pepper
Preheat the oven to 425°. Slice the squash in half and scoop out the strings and seeds (as you would for a pumpkin). Place the squash on a baking dish
Basil and Arugula Pesto:
2 handfuls of fresh basil leaves
1 handful of fresh baby arugula
¼ cup walnuts
¼ cup parmesan cheese
Olive oil
Pinch of salt
A few cracks of fresh ground black pepper
In a food processor
Bring the two together by topping the roasted, hot spaghetti squash with a dollop of pesto. Turn to coat and serve warm. It’s a nice nod to summer flavors with a hint of what’s coming for fall.
 |
| Basket from market: basil, jalapeno cheddar bread, speghetti squash, arugula and green beans. |
Saturday, August 28, 2010
Fresh Herb & Sunflower Chicken Piccata

3 boneless, skinless chicken breasts, pounded flat
For 'breading':
1/4 cup roasted, salted sunflower seeds
1 packet instant oatmeal
6 sprigs of fresh thyme
1 stem (about 8-10 leaves) fresh oregano
4 fresh basil leaves
1 sprig rosemary
3 stems chives
fresh cracked black pepper
For sauce:
1/4 cup chicken broth (may use more for additional sauce)
1 fresh lemon
1 tsp capers
fresh cracked black pepper
Olive oil & butter for cooking.
Preheat the oven to 350°.
Remove the stems from the herbs and rough chop. Add herbs to a food processor
In the same non-stick pan used to pan-fry the chicken, add chicken broth to deglaze. Use a wooden spoon
Top cooked chicken breasts with slices of lemon and then spoon sauce over top. The chicken goes really well with rice or whole wheat pasta and a side of steamed broccoli which can also topped with a spoonful of sauce. Fresh, healthy, full of vitamins and minerals!
What other breading substitutes have you tried? Walnuts? Almonds?
Thursday, August 26, 2010
Healthy, Hearty Veggie Pasta Casserole - Freezer Friendly
I had a request for this earlier and it's something I've made to take to friends and neighbors in need of a little help. It is a great casserole style pasta with lots of healthy veggies and protein that feeds a bunch or will freeze well for leftovers.
1 box whole grain rotini or ziti
1 1b ground chicken
1 28 ounce can crushed tomatoes with basil
1 zucchini
¼ cup red onion
½ pint button mushrooms
1 package frozen spinach, thawed, drained and dried
1 roasted red pepper (I use the jar version in oil)
1 clove garlic
Basil leaves or basil paste
Tomato paste
Bay leaf
Olive oil
Fennel seed
Red pepper flakes
Salt and white pepper
Shredded mozzarella
Grated aged parmesan
Dice zucchini, onions, garlic, red pepper and quarter mushrooms.
Start by browning the ground chicken in a large skillet with palm full of fennel seeds and shake of red pepper flakes, salt and pepper to taste. Do not strain. Halfway through browning add zuchinni and mushrooms and let sauté but don’t overcook since the whole dish will be baked.
For sauce: in a medium sauce pan, add enough olive oil to coat bottom of pan. Add red onion and garlic, sauté until translucent, add a pinch of salt and pepper. Add tomatoes and begin to simmer. Add bay leaf, 2-3 chopped basil leaves or 1 tblspn of basil paste and 1 tblespn of tomato paste. Stir in roasted red pepper. Let sauce simmer for at least 10 minutes.
Transfer sauce to skillet with chicken and veggies, add spinach to sauce and mix it all well. Don’t forget to take out the bay leaf!
Cook pasta to al denté. When done, transfer drained pasta to large casserole dish. Add sauce over pasta and toss to coat. Sprinkle mozzarella over entire top and grate parmesean over. Bake until bubbly and cheese starts to brown (at 350°).
I think it would also be really tasty ‘Greek style’ with feta cheese baked in and just the parm on top. Enjoy and make it for someone in need of a helping hand.
Tuesday, August 24, 2010
Who Wants a Cookie? Chocolate Melt & Toffee Bit Cookies
My husband is a routine kinda guy and apparently his new routine involves finishing dinner and asking me when the cookies will be baked. "What cookies?" is usually how I respond, but last night I was feeling the sugar craze myself (not that his sugar cravings are any less important than mine, but I am the one baking them so I say when...I say whoooo...I say wheennn . Anyone? Anyone?). As you guys know, baking does not come naturally to me, but my friends might say that the one sugary treat I am confident in making is a delicious batch of toffee cookies. The recipe used to be on the back of the Heath Bar Toffee Bit Pieces bag and it makes the most indulgent, chewy, buttery-goodness bites you've have ever had. Last night called for chocolate though so the recipe got a few modifications and shake ups and the outcome was nothing short of a cookie masterpiece.
Here's what I put together:
2 sticks butter
2/3 cups granulated sugar
1 & 1/2 cups brown sugar
1.5 tsp pure vanilla
3 eggs
3 & 1/2 cups all purpose flour
2 tsp baking soda
2 tsp cream of tartar
1/4 tsp salt
1 bag toffee chips
1/4 - 1/2 cup shaved semi-sweet baking chocolate
Preheat the oven to 350°. In your favorite stand mixer , blend the 2 sticks, room temp butter (I used salted butter for this recipe which I think is ok because these are toffee and chocolate AND I am not sure how much I buy into the salted vs. unsalted baking controversy). If you are taking straight from the fridge, pop the butter into the microwave for 10 seconds to loosen it up. Put the mixer on low and add in sugars, vanilla and eggs one at a time.
In a separate bowl, sift together the flour, baking soda, cream of tartar and salt. With the mixer on low, slowly add in the sifted ingredients. Hopefully your kitchen won't end up looking like the North Pole as mine did, but baking is meant to be messy, right? Once the ingredients are incorporated fold in the chips and as much chocolate as you like.
Drop mounds on a non-stick or airbake
 sheet and bake for 8-11 minutes or until a beautiful golden color and should make about 3-4 dozen cookies. They'll deflate a little at the very end and definitely when you bring them out to cool. Served up warm with milk, you will be in heaven. I also thought about sandwiching two together with a marshmallow center...maybe I'll try that tonight...
 I also froze the dough I didn't bake last night so I will be sure to post if those are just as tasty as the fresh. What's your favorite cookie recipe?
Here's what I put together:
2 sticks butter
2/3 cups granulated sugar
1 & 1/2 cups brown sugar
1.5 tsp pure vanilla
3 eggs
3 & 1/2 cups all purpose flour
2 tsp baking soda
2 tsp cream of tartar
1/4 tsp salt
1 bag toffee chips
1/4 - 1/2 cup shaved semi-sweet baking chocolate
Preheat the oven to 350°. In your favorite stand mixer
In a separate bowl, sift together the flour, baking soda, cream of tartar and salt. With the mixer on low, slowly add in the sifted ingredients. Hopefully your kitchen won't end up looking like the North Pole as mine did, but baking is meant to be messy, right? Once the ingredients are incorporated fold in the chips and as much chocolate as you like.
Drop mounds on a non-stick

Subscribe to:
Posts (Atom)