Showing posts with label sage. Show all posts

Tuesday, October 19, 2010

Pork Roast with Lemon Sage Sauce and Candied Carrots


Today's recipe is a throw back to my childhood, when parents and grandparents alike fought to get kids to eat their vegetables.  This recipe, along with the 'carrots help you see at night' story, definitely got us into veggies.   So, I picked up a small bunch of baby carrots from Fertile Crescent Farm and paired the side dish with roast pork finished with citrus/herb sauce.  Here's the fix:
Candied Carrots:
1 bunch of baby carrots
2 tbsp butter
2 tbsp brown sugar
salt & pepper
canola oil
Simple, simple, simple. Preheat the oven to 350°.  Chop stems off carrots, rinse and peel. In a sauté pan over medium-lo heat, add a drizzle of canola oil and the butter to melt.  Add carrots and toss to coat.  Cook for approximately 2-3 minutes and then add brown sugar, pinch of salt and a crack of black pepper.  Toss to coat and then transfer to a non-stick roasting pan and place in oven for about 10 minutes or until a nice caramelization forms.  Flip once to get all sides evenly browned.  Serve warm.
Pork Roast:
1 1-1.5 lb pork roast
1/4 cup extra virgin olive oil
Zest from 1/2 lemon
Juice from 1/2 lemon (or whole if it does not render enough liquid)
1 tsp capers (with liquid)
4-6 leaves fresh sage chopped
bay leaf
salt & pepper
Start by brining the roast which will make the meat moist and flavorful.  In a large ziploc, add olive oil, lemon zest, juice and sliced lemon, capers, chopped sage and bay leaf.  Towel dry the pork roast and season with salt and pepper.  Transfer the roast to ziploc, add about 1/2 tbsp more salt, seal tightly and toss the mixture, massaging the liquid into the roast. Make sure all liquid is equally distributed around the roast and place bag into the refrigerator for 20 minutes (the acid from the lemon will start to 'cook' the meat so it should be removed from the brine within 30 minutes at the most).  Remove from the refrigerator, pull the roast out, pat dry and discard the liquid.  Let the meat come to room temperature. 
Warm a cast-iron skillet over medium heat with about 1 tbsp olive oil.  Sear the roast on all sides, about 2 minutes per side. Next, transfer the skillet with roast into an oven at 350° and roast for 15-20 minutes.  The roast should rest under an aluminum foil tent for at least 5 minutes before slicing.  Meat should come out juicy and slightly pink in the middle.  For safety, internal temperature should be reach 160°.
I finished the pork with a super simple lemon sage sauce...combine 2 tbsp 2% plain Greek yogurt, 1 tsp olive oil mayonnaise, zest from 1/2 lemon, 1 tsp lemon juice and 3 leaves fresh chopped sage.  Season with a little salt and spoon over sliced roast! 


Tuesday, September 28, 2010

Butternut Squash and Ricotta Gnocchi

This past Saturday I picked up a butternut squash from Victory Farms and knew exactly what I wanted to make...warm, fluffy pillows of gnocchi, full of flavor and perfect for a rainy Fall night.  This recipe requires a little prep time but is worth it in the end. Even though there is flour in the recipe, it's especially great for those craving pasta but watching the flour intake since the bulk of the gnocchi is made up of ricotta cheese and butternut squash.  Here's the fix:

1 butternut squash, cubed
1 16 oz. tub of part skim ricotta cheese
2 tbsp grated Parmesan cheese
1/4 tsp nutmeg (plus more for roasting the squash)
2 large eggs lightly beaten
1/2 - 1 cup and more for rolling gnocchi
salt & pepper

Start by roasting the squash.  For those of you that haven't worked with it before, I like to peel it first and then cut it in 1/2 lengthwise.  It has seeds just like a pumpkin that need to come out so you can either spoon them out or cut around them.  Cut into equal size cubes, sprinkle with a touch of nutmeg, S & P and a drizzle of olive oil.  Roast in the oven at 425° for about 15 minutes, flipping once or twice to help get the caramel color on all sides. You'll want it a little brown on the edges for great flavor so go longer if necessary. 

Once out of the oven, transfer to paper towels to soak out some of the oil.  The squash should be as dry as possible before adding to the dough.  After drying, transfer to a food processor or use a potato masher to blend the squash until smooth.  Place the mixture in the fridge to allow to cool before beginning on dough.

The ricotta will also need to be prepped which can be done the night before by wrapping in a cheesecloth and suspending over a bowl to properly drain or, if you are like me, the 'super-quick because don't always think ahead' way - wrapped in a clean, thin kitchen towel  and squeezed with your hands until every last drop of liquid runs out.  The ricotta needs to be as dry as possible to form a dough that will hold its shape.

In a large mixing bowl, add the 'dried' ricotta, egg, parm, nutmeg and blend together until smooth.  Next add about 3/4 cup of the roasted squash mixture and fold into dough. Add salt & pepper for proper seasoning.  This will loosen it up considerably but the flour will help to bind the dough together again.  Start with 1/4 cup mixed in and slowly add more until the dough can hold it's shape.

At this point, the dough should be refrigerated for about an hour.  Prep a baking sheet with a healthy amount of flour distributed over the pan and a separate pan lined with parchment paper. Once the dough comes out of the refrigerator, form into dough balls by rolling in your hands or roll into a small tube from which to pinch off about one inch sized pieces in the form of traditional gnocchi.  Either shape will then need to be 'rolled' in the flour, sifted of any excess by tossing back and forth in hands and then transferred to the baking sheet lined with paper.  Once formed, the gnocchi will then go back into the refrigerator for at least another hour or longer.

To cook, bring up a pot of salted boiling water and carefully drop the individual pieces into the water. They will cook for approximately 3-5 minutes and are done when they float to the top.  The gnocchi should be scooped out with a mesh strainer and transferred to a paper towel before plating with sauce.

Speaking of sauce...this one goes beautifully with the butternut squash: 1/2 stick unsalted butter browned (over low-medium heat) in a sauté pan with ribbons of sage leaves and a small dice of a cured meat like Pancetta (season with salt and pepper to taste).  Watch the edge of the pan for browning and promptly remove from heat.  Spoon over gnocchi and top with grated Parmesan.

Would love to show you a picture of the finished product but our eyes and stomachs were focused in on the feast and there was no stopping 'em!

Monday, May 17, 2010

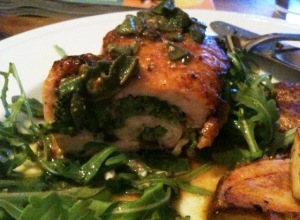
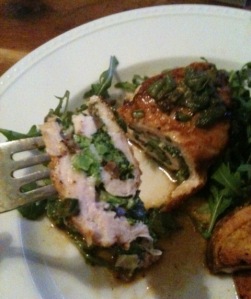
Stuffed Chicken Breast with Sage Butter Sauce

New York City is definitely the place to be for delicious food and trying new things.  We got back a few hours ago from a trip to celebrate our 1 year anniversary and I can't stop thinking about all the tastes of NYC.  Hoping to extend the celebration for just a little longer, I thought I would try my hand at a special dinner.  Here's what I came up with:

Stuffed Chicken Breast with Sage Butter Sauce and Pomme Frites

1 large chicken breast halved lengthwise

1/2 cup raw broccoli florets

1 shallot

1/4 cup chopped mushrooms

1/4 cup marscapone cheese

2 tbsp shredded mozzarella

olive oil

2 tbsp butter

6 sage leaves

chicken broth

1 tbsp dijon mustard

s & p

1 baking potato

Preheat oven to 425 degrees.  Slice potato in half, lengthwise, then slice each half into 4-5 strips.  Coat in olive oil, s & p and put into oven for about 20-25 minutes, flipping once.

Bring salted water to boil to blanch broccoli (boil for about a minute, then soak in ice bath to stop cooking).  In a separate sauce pan, saute shallots and mushrooms in a little bit of extra virgin olive oil, butter and season with s & p.  Drain the broccoli and transfer to a mixing bowl.  Add shallots and mushrooms and mix in marscapone and mozzarella cheese.  This will be your stuffing for the chicken.

Pound both pieces of chicken flat, salt and pepper both sides.  Next spoon the mixture over one entire side of both pieces of chicken.  Roll the chicken from top to bottom and secure with toothpicks.  

Brown the chicken breasts in a little EVOO and 1 tbsp of butter on the stove top in a saute pan that can be transferred to the oven.  Start with the seam side up and brown for about 3 minutes on each side or until a good caramel color develops.  Once both sides have browned,  transfer the entire pan to the oven for approximately 10 minutes.

Sage Butter Sauce

Once you pull the pan out of the oven, transfer the chicken breasts to the serving plates.  I plated ours over arugula for an extra bite.  On low heat on the stove top, add 1 tbsp butter to the saute pan used for to cook the chicken breast.  Add chicken broth (about 1/4 cup) to sauce and use a whisk to work all of the brown bits off of the bottom.  Next whisk in a tbsp of dijon mustard and finish with the chopped sage.  Let the sauce simmer a bit and s & p to taste.

Spoon the sauce over the chicken, plate the fries and you are done! Don't forget to remove the toothpicks before serving...sauteed splinters tend to be a little chewy. ;)