We've really begun to see some of the benefits of moving our herb garden last summer. Even though it was a lot of work, I think it's totally paid off. What do you think?!
Year II-Phase II involves 4 raised garden beds for tomatoes, peppers, cucumbers, greens, etc. So far we have 1 box in, 3 to go. Pics to follow...
Showing posts with label herbs. Show all posts
Showing posts with label herbs. Show all posts
Wednesday, May 11, 2011
Saturday, August 28, 2010
Fresh Herb & Sunflower Chicken Piccata
Lemon and chicken go naturally together. Throw in some fresh herbs and it's an end of the summer party. I really wanted to go alternative on the breading and experiment with anything that would infuse flavor and texture. Sunflower seeds and oatmeal worked really, really well. So well in fact, there was no need for the 3 step breading process (flour, eggs, breading), I just pounded the chicken flat and pushed them right into the seed, oatmeal and herb mixture. It was clingy enough to stick and browned up beautifully. The crunch was perfect and the herbs from the garden perfumed the kitchen and added fresh flavor to the chicken. Here's the new, healthy take on chicken piccata...
3 boneless, skinless chicken breasts, pounded flat
For 'breading':
1/4 cup roasted, salted sunflower seeds
1 packet instant oatmeal
6 sprigs of fresh thyme
1 stem (about 8-10 leaves) fresh oregano
4 fresh basil leaves
1 sprig rosemary
3 stems chives
fresh cracked black pepper
For sauce:
1/4 cup chicken broth (may use more for additional sauce)
1 fresh lemon
1 tsp capers
fresh cracked black pepper
Olive oil & butter for cooking.
Preheat the oven to 350°.
Remove the stems from the herbs and rough chop. Add herbs to a food processor and pulse with seeds, oatmeal and a few cracks of black pepper until coarsely ground. Spread the mixture onto a large prep plate and dredge the pounded chicken through the mixture. Use your tongs
 to press the mixture into the chicken to help it stick. In a non-stick pan
 , add enough olive oil to coat the bottom of the pan and over medium high heat, add 1 tbsp butter. Once melted, add chicken breasts and cook for about 2-3 minutes on each side or until golden brown. Transfer to a non-stick baking sheet
 and bake for about 8-10 minutes.
In the same non-stick pan used to pan-fry the chicken, add chicken broth to deglaze. Use a wooden spoon to loosen up all bits from pan. Slice one lemon in 1/2 (reserving a few rings to top the finished chicken) and squeeze all juice into the sauce. Add the lemon halves into the pan while the sauce reduces. Reduce on med-lo for about 8 minutes and stir in 1/4 tsp corn starch and a few cracks of black pepper. Add 1 tsp capers and keep on low until ready to serve. Add more chicken stock to balance flavor if necessary.
Top cooked chicken breasts with slices of lemon and then spoon sauce over top. The chicken goes really well with rice or whole wheat pasta and a side of steamed broccoli which can also topped with a spoonful of sauce. Fresh, healthy, full of vitamins and minerals!
What other breading substitutes have you tried? Walnuts? Almonds?
3 boneless, skinless chicken breasts, pounded flat
For 'breading':
1/4 cup roasted, salted sunflower seeds
1 packet instant oatmeal
6 sprigs of fresh thyme
1 stem (about 8-10 leaves) fresh oregano
4 fresh basil leaves
1 sprig rosemary
3 stems chives
fresh cracked black pepper
For sauce:
1/4 cup chicken broth (may use more for additional sauce)
1 fresh lemon
1 tsp capers
fresh cracked black pepper
Olive oil & butter for cooking.
Preheat the oven to 350°.
Remove the stems from the herbs and rough chop. Add herbs to a food processor
In the same non-stick pan used to pan-fry the chicken, add chicken broth to deglaze. Use a wooden spoon
Top cooked chicken breasts with slices of lemon and then spoon sauce over top. The chicken goes really well with rice or whole wheat pasta and a side of steamed broccoli which can also topped with a spoonful of sauce. Fresh, healthy, full of vitamins and minerals!
What other breading substitutes have you tried? Walnuts? Almonds?
Sunday, August 15, 2010
Rosemary Crusted Lamb Chops with Lemon Minted Peas
So, I have to start by saying that I can count on one hand the number of times I've had lamb. However, while at the store this morning, I found a small rack of lamb for less that $2 and it was the perfect amount for two. Knowing 3 things: I like peas, I have an abundance of mint and I'm a fan of a tender cut of meat with almost any kind of sauce - I decided to go for it. With that out in the open, I have one thing to say - what, for the love of Pete, was I waiting for? The combination of peas, mint, lamb and rosemary could quite possibly be sent from Heaven. Here's how it came together for us tonight...
For the lamb:
3 sprigs of fresh rosemary, coarse chop
1 tbsp dijon
1 tsp garlic salt
juice of 1/2 lemon
freshly cracked black pepper
extra virgin olive oil
Trim the fat from the rack, pat dry and season both sides with salt & pepper. Combine the ingredients above, whisking the olive oil in until a thick paste forms. Smear the mixture over all sides of the lamb and refrigerate for at least an hour, longer if you have the time.
Preheat the oven to 375° and in a heavy bottom sauté pan that can be transferred to the oven (I use my cast iron skillet ), warm 2 tbsps of olive oil over medium-hi heat. When the oil starts to ripple, add the rack of lamb fat side down to brown, turning once at 3 minutes and doing the same on the opposite side. Transfer the entire pan to the oven and let it cook for 12-14 minutes depending on your temperature preference. Remove the lamb from the pan and place on a chopping board, cover with foil and let rest for at least 5 minutes.
For the sauce:
Move the sauté pan back to the stovetop with the drippings and warm through on medium-low heat. Add 2 cloves of minced garlic and sauté. Using a whisk, add 1 turn of a dry red wine, 1/2 cup of chicken stock, 1 tbsp butter and 1 sprig of rosemary, coarsely chopped. Let the sauce reduce down over heat and to finish, add 1 tbsp of plain greek yogurt. Keep warm until you are ready to serve.
Lemon Minted Smashed Peas
2 cups frozen young peas, blanched
juice of 1/2 lemon
1/4 cup chicken stock
8-10 leaves fresh mint, finely chopped
1/4 tsp of freshly chopped rosemary
1/4 tsp garlic salt
freshly cracked black pepper
To plate, layer the smashed peas first, top with 3 chops and then drizzle 1-2 tbsps of the sauce over the lamb. Top with chives to make it pretty.
For the lamb:
3 sprigs of fresh rosemary, coarse chop
1 tbsp dijon
1 tsp garlic salt
juice of 1/2 lemon
freshly cracked black pepper
extra virgin olive oil
Trim the fat from the rack, pat dry and season both sides with salt & pepper. Combine the ingredients above, whisking the olive oil in until a thick paste forms. Smear the mixture over all sides of the lamb and refrigerate for at least an hour, longer if you have the time.
Preheat the oven to 375° and in a heavy bottom sauté pan that can be transferred to the oven (I use my cast iron skillet
For the sauce:
Move the sauté pan back to the stovetop with the drippings and warm through on medium-low heat. Add 2 cloves of minced garlic and sauté. Using a whisk, add 1 turn of a dry red wine, 1/2 cup of chicken stock, 1 tbsp butter and 1 sprig of rosemary, coarsely chopped. Let the sauce reduce down over heat and to finish, add 1 tbsp of plain greek yogurt. Keep warm until you are ready to serve.
Lemon Minted Smashed Peas
2 cups frozen young peas, blanched
juice of 1/2 lemon
1/4 cup chicken stock
8-10 leaves fresh mint, finely chopped
1/4 tsp of freshly chopped rosemary
1/4 tsp garlic salt
freshly cracked black pepper
Blanch the peas first and then transfer to a sauce pot. Over low heat, warm all ingredients above through. Using a hand blender , gently mash the peas, leaving some whole. Finish with a little pecorino romano.

To plate, layer the smashed peas first, top with 3 chops and then drizzle 1-2 tbsps of the sauce over the lamb. Top with chives to make it pretty.
Monday, August 2, 2010
Gardening for Gastronomic Delights – Project Garden Grow, Phase I

With a break in the heat, my husband and I set out to begin Phase I of a major overhaul of our yard. We have the perfect urban yard for gardening but not always the perfect soil, so we've decided to start fresh in a few areas. The first phase began yesterday and involved a deconstruction of an area we refer to as the 'Tea Garden'. It's a great portion of our yard that is off to the side of our house and, thankfully, fenced off from our dogs constant trampling. You step down into a level yard that is walled-in with ivy, hostas and spring flowers. There is a sidewalk that runs the length of our house which sits atop a stone wall that I am sure was built decades (if not almost a century!) ago. The wall is in great shape, the perennials, however, were not. So, we ripped, we tore, we dug, we raked and we kept a close eye out for snakes. Surprisingly, there were none to be seen. After 5 hours of digging and sifting, we stood back and admired what will soon be our new herb garden. Of course, all of this work is a little late in the season, but we are looking forward to having everything prepped and ready for the spring. Phase II is slated for next weekend and involves a second area of the yard, a rented cultivator and some serious tools. Or it may involve hiring a professional, we'll see where the week takes us....
The purpose of all of this labor intensive and back-breaking work is twofold. One, our yard needs a little love and two, I want to be able to cook with foods that I've grown. While my family didn't farm when I was growing up, we were in the country and surrounded by wild blackberries, apple orchards and area farmers. We had some tomato plants in the yard, cucumbers hanging from the back fence and a neighbor that plotted out a healthy sized garden of corn, tomatoes, peppers, etc. and usually delivered a basketful each summer. This is the great reward I am seeking... to work diligently on something that I (and my neighbors) can benefit from directly!
So, that's our goal. I am looking for advice on what to plant in a central Virginia climate and advice on how to keep the garden healthy and environmentally (and economically) friendly...all comments will be greatly appreciated and taken into full consideration!
Labels:
cooking,
eating,
food,
garden,
herbs,
homegrown,
Project Garden Grow,
recipes,
vegetables
Wednesday, June 30, 2010
Comforting Calzones
 [/caption]
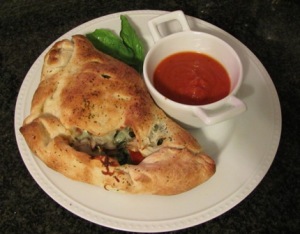
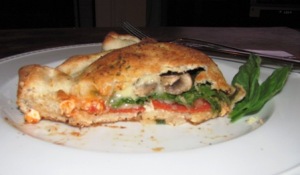
Sometimes it's just about recreating an old favorite. When it comes to my husband's hunger and taste buds, that couldn't be more true. He is a fan of all things cheesy & tomato sauce related so last night I surprised him with a make-your-own Calzone bar. I just bought premade pizza dough, sliced and diced up some toppings and put out the cheese and sauce. After that it was up to him to stuff away. He got so excited he took a few pictures to post on the blog...attached are his 'before and after' pics:
He made more of a Stromboli with sauce, toppings and cheese and I made a Calzone with reduced fat ricotta, light sauce, turkey pepperoni, arugula, onions, mushrooms and basil. We topped both with extra virgin olive oil and dried Italian herbs and spices and baked them at 425 degrees for about 10-15 minutes.
Served up with the same homemade marinara I included in the homemade ravioli post, they were warm, comforting, tasty, cheesy, filling, little pillows of yum.
[caption id="attachment_173" align="alignleft" width="300" caption="Calzone Dinner"] [/caption]
[caption id="attachment_174" align="alignnone" width="300" caption="Layers of flavor. "] [/caption]
Monday, June 14, 2010
Summer Veggies, compliments of f-ANNE-tastic!
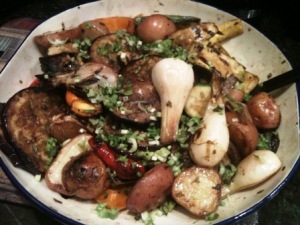
 We spent the weekend at my parent's house with my sister, brother, my brother's lady and, of course, my parents. It's hard not to feel happy and content there, especially when they special order great summer weather complete with sunshine galore and one 'love to watch it roll in' summer thunderstorm. It's even harder not to feel full when we are home, the Blue Ridge has a plentiful supply of homegrown veggies and herbs and yumminess. We popped over to the Farmer's Market Saturday morning and ended up with zucchini, squash, green onions, eggplant, peppers and potatoes. My sister brought her recipe for a vegetable marinade and we finished them off on the grill for a little extra flavor. You have to check these out!
Marinade:
Olive oil
Balsamic Vinegar
White wine
Garlic
Fresh herbs- we used basil, thyme, green onion tops - some for the marinade and some to top the veggies when cooked.
S & P
Equal parts olive oil and vinegar with a splash of white wine. Dice up the herbs and as much minced garlic as you like, salt and pepper to taste.
Slice up the vegetables but keep all the cuts fairly large so they can get plenty of surface area on the grill. The potatoes should be boiled first to soften (don't cook all the way through). The veggies should marinade for at least an hour but the longer the better. When you put them on the grill, reserve the marinade at the bottom of the bowl to pour over the finished product. Top with the remaining herbs and you are set! The veggies and a few slices of specialty bread were plenty for the ladies but don't feel bad for the guys, we grilled some chicken that had soaked in an equally delicious marinade for the afternoon.
Marinade for grilled chicken breast with skin, bone-in:
Olive oil
Red wine vinegar
2 tbsp dijon mustard
2 crushed garlic cloves
1 tbsp dried thyme
2 bay leaves
Marinade for 2 hours in the fridge. The chicken comes off the grill moist and flavorful (okay, okay, I had a bite).
Did I mention that I love summer?
Thursday, June 3, 2010
Rick Bayless recipe for Chorizo Verde
 In keeping with the 'green' theme, I wanted to try a new recipe that uses fresh herbs, peppers, greens and pork...Chorizo Verde. I saw Rick Bayless making this on his PBS show. The finished product turns to a queso like tortilla filling and is a slightly spicy treat. I also put together a roasted tomatillo salsa that is super easy and adds a sweet element to contrast the heat.
Chorizo Verde:
1 lb pork
1/2 onion
2 medium poblano chilis
1-2 serranos
cilantro
beer
1 cup to 1.5 cup manchego cheese
2 cups raw spinach
Start by roasting the poblanos over a grill flame until charred. Remove charred skin by running under cool water and peeling off with your fingers. Poblanos then go into a food processor with the serranos and a medium bunch of cilantro. Pulse until pureed.
In a large skillet, brown pork and then add the 'verde'. Saute for a bit and add a pinch of salt and the onions. Onto the queso! Give the skillet 1 to 2 full turns of beer, enough to almost cover the pork mixture. Add the shredded cheese and spinach. Turn the mixture until the cheese melts and the spinach wilts - that's it!
Tomatillo salsa:
In the same food processor used for the poblano mixture (a little flavor will be left over), blend a roasted tomatillo, half to a full jalapeno, 1/4 cup onion, 1/2 pint grape tomatoes, handful of fresh cilantro. Pinch of garlic salt, cumin and cayenne pepper and the juice of 1/2 a lime. Pulse, pulse, pulse until it's the texture you like. I like this one pretty thin.
Put it all together! Warm tortilla, scoop full of the chorizo verde, a few leaves of raw spinach and a couple of slices of avocado. Yum! Add the salsa to the tortilla, enjoy the salsa with chips or over some shredded lettuce. Do whatcha like. A margarita on the side never hurt anyone either...
Wednesday, June 2, 2010
Veggie Pesto
Non-traditional pesto has become one of my favorite go-to foods especially when trying to get in my daily 5. Using veggies along with herbs, nuts, olive oil and good cheese, you can create a lot of different tasty combinations that are flavorful and healthy. My favorite, as of late, is pea pesto and it whips up in a heartbeat so it's a great quick grab. I blend it all using my Cuisinart hand blender with the processor attachment and I usually vary the ingredients each time. However, here's one that is pretty standard:
1 can sweet young peas or 8 oz. frozen peas, thawed and rinsed
olive oil (about 2-3 tbsp)
walnuts (between 1/4 to 1/2 cup depending on how much crunch you like)
parmesan cheese (about 3-4 oz)
a few basil leaves to taste (optional)
1 garlic clove (optional)
salt & pepper
Blend away! Once it's whipped up, I use it as a sandwich spread (this morning I made an egg salad using 1 hardboiled egg and a tbsp pesto), a dip with crudite, a pasta sauce, a salad topper and occasionally just a bite by itself. I feel okay about that though...it's a veggie pesto after all!
Tuesday, June 1, 2010
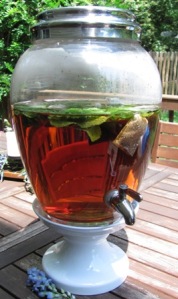
Summertime Summertime Sum Sum Summertime – Sun Tea!
 Do we need any more reasons to love Summer? Sun + water + tea + mint in my favorite Pottery Barn drink dispenser (thanks, Sally!). Enough said!
Subscribe to:
Posts (Atom)


