Showing posts with label recipes. Show all posts

Wednesday, November 2, 2011

Gluten Free Angel Hair Pasta with Roasted Garlic & Mushroom Pumpkin Sauce

I could only think of pumpkin on Halloween night which turned out to work in my favor. I had seen a recipe for a pumpkin lasagna that sounded fantastic so I went to the drawing board with what I had in my pantry. The end result was a creamy, well-balanced pumpkin sauce accented with roasted garlic and flecked with roasted mushrooms. I’ll be making this one over and over this fall.

Ingredients:
1 pint crimini mushrooms, sliced
1 head of garlic, still in paper
8 leaves of fresh sage, diced
3 strips of thick cut bacon, diced into bit sized pieces
1 can pumpkin puree or 1 cup fresh puree
1 cup milk
1/4 cup chicken stock
1/4 tsp nutmeg
1/2 cup grated Parmesan cheese and more for topping
1 package brown rice angel hair pasta
4 stems chives, diced for topping

Preperation:
Set oven to 350°. Arrange sliced mushrooms on a baking sheet and toss in 1 tbsp olive oil with 2/3′s of the chopped sage, salt and pepper. Chop the top off of the garlic head, place on roasting pan and then top with about 1 tbsp olive oil. Roast for about 25-30 minutes or until garlic is soft to the touch. Stir mushrooms occasionally.
Meanwhile, pan fry the bacon in a large skillet. Once crisp, transfer to a paper towel lined plate to drain. Leave the drippings and add the pumpkin to the skillet over low heat. Use a wooden spoon to stir and pick up the brown bits from the bottom of the pan. Next add in the roasted mushrooms, bacon, remaining sage, milk and chicken stock. Stir to combine. Dice up 1-2 cloves of the roasted garlic and add to sauce.
Cook the brown rice pasta to just under al dente. Drain and add directly to skillet with sauce. Add the parmesan cheese and use tongs to combine the pasta and sauce over low heat. Plate in serving bowls, sprinkle with a little extra cheese and the diced chives. Enjoy!

Thursday, September 8, 2011

Italian Style Brisket and Zucchini Stackers

A modified take on Tyler Florence’s brisket recipe and a side dish to complement any entree…
Italian Style Brisket
Ingredients:
4 Roma tomatoes, halved
8 springs fresh thyme
1 garlic cloves, smashed and finely minced
1/4 teaspoon kosher salt, plus more for seasoning
4 sprigs fresh rosemary, needles striped from the stem and chopped
1/4 cup extra-virgin olive oil
2 lb brisket
Fresh cracked black pepper
6 basil leaves, shredded
2 cups carrots, rough cut
2 celery stalks, rough cut
2 small white onion, quartered
1 cups dry red wine
1 (16-ounce) can whole tomatoes with basil
1 handful fresh flat-leaf parsley leaves
2 bay leaves
1/4 tsp crushed red pepper flakes (optional)
Preparation:
Preheat oven to 300­°. Half Roma tomatoes, season with salt and pepper and place thyme stems directly over each half. Drizzle with olive oil and oven roast for about 25-30 minutes or until edges brown lightly.
Kick the heat up on oven to 325°. Combine the chopped rosemary leaves with 1/8 cup olive oil, finely minced garlic, 1/4 tsp kosher salt and about 1/8 tsp fresh cracked black pepper to make a thick paste. In a dutch oven or heavy-bottomed large pot, add olive oil to coat bottom. Season all sides of the brisket with salt and pepper and add to hot oil to brown.

Once a good color has formed on all sides, cut the heat and evenly coat the top of the brisket with the rosemary paste mixture. Next add roasted tomatoes (with thyme stems), basil, carrots, celery, onion, canned tomatoes, wine, bay and top with parsley and more rosemary if you have it.

Top dutch oven with a lid or wrap tightly with aluminum foil. Transfer to oven for 3-4 hours cooking time, baste with sauce every 30 minutes. If liquid drops too low, add beef stock or water in small increments to keep the brisket mostly covered.
Once cooked, transfer the brisket to a cutting board to rest for 10 minutes. Return pot to stove top, set the heat to low and use a hand blender to blend all ingredients thoroughly (remove bay leaves and herb stems first).  Add 1/4 tsp fresh red pepper flakes for a spicy kick (optional).

Serve sauce along side sliced brisket and use it in the side dish…
Zucchini Stacks
Ingredients:
1 ‘One Ball’  zucchini, 1/4″ slices
1 red pepper, sliced in rings
1 green pepper, sliced in rings
1 tbsp olive oil
1/4 tsp red pepper flakes
salt and pepper
1 cup homemade tomato sauce
1/2 cup shredded mozzarella
1/4 cup grated Parmesan

Season the sliced vegetables with olive oil, red pepper flakes and salt and pepper. Grill them on medium-hi until grill marks form, flipping once.

Next, transfer to an oiled baking dish by stacking the vegetables – zucchini on the bottom, topped with the pepper rings. Cover each stack with tomato sauce, top evenly with cheeses and bake until the brown and bubbly.

Given the current power outage due to Irene, I cooked mine covered with foil on the grill and it took about 20 minutes.
The braised brisket becomes very tender after hours of cooking and absorbs a punch of flavor from the wine and roasted tomatoes. They really work together, the sauce and the brisket, each lending their flavors to the other.  Even when topped with the rich tomato sauce, the veggies hold their own earthy flavors.  The zucchini resembles a pumpkin in looks, taste and seeds which can be removed if you are not a fan.  I think I’ll pick up a few more next week at the Farmer’s Market, stuff them with a bacon and grain combination and roast them…

Wednesday, June 15, 2011

Jalapeno Ranch Slaw Burgers

This is a delicious and non-traditional topper for a burger, great crunch and loads of flavor!

Jalapeno Ranch Slaw Burgers
Slaw

(makes 4-6 servings)
1/2 small red cabbage, shredded
1/2 pint sun gold tomatoes, quartered
2 tbsp fresh chopped parsley
3 spring onions, greens and whites diced
Dressing:
(makes 1 cup – save remainder to top salads, sandwiches, eggs, chips, chicken, what have you…)
1/2 cup Greek yogurt
1/2 cup buttermilk
1 tsp fresh chopped chives
1 tsp fresh parsley, chopped
1/2 tsp fresh dill, chopped
1/2 tsp garlic salt
1/4 tsp pepper
1 jalapeno, diced
1 Serrano chili, fresh grated
pinch of salt
In a large bowl, combine cabbage, tomatoes, chives and parsley. Set aside. Combine all ingredients for ranch dressing in a separate bowl, use a hand grater to grate the entire Serrano chili into the dressing. Mix well. For the slaw, add about 1/4 cup of dressing and combine. Add more dressing if desired and finish with a little extra salt and pepper to taste. Cover bowl in plastic wrap and chill in the fridge for at least 20 minutes before serving to let the flavors come together.  Store remainder of ranch in a separate, air tight container in the fridge.

For the burgers, we keep it simple – scant 1/4 tsp garlic salt and 1/4 tsp pepper per 1 lb of meat.  Form into patties and add a sprinkle of kosher salt to the outside of the burgers just before grilling. Grill for about 4-5 minutes on each side over 400° grill for medium to medium rare burgers. The Faith Farm ground beef we picked up at the farmer's market came out perfectly - so much flavor for so little work and the burgers were perfectly juicy.
Jalapeno Ranch Slaw Burgers

Plate it up on a whole wheat bun with a heaping mound of the Jalapeno Ranch Slaw, nothing else needed!

Tuesday, May 17, 2011

Spicy Chicken Lettuce Wraps

Spicy Chicken Lettuce Wraps
Prep time:  10 minutes  Cook time: 15 minutes
Serves: 4

Ingredients:
1 tbsp canola oil
1 boneless, skinless chicken breast, sliced into strips
2 tbsp hoisin sauce
1 tbsp tamari
1 tbsp lite rice wine vinegar
1 tbsp sesame oil
1 jalapeno or bird chili sliced thin
1 red bell pepper, sliced into strips
6 white button mushroom caps, sliced
4 spring onions (whites and greens) diced on the diagonal
2 carrots, shredded
1/2 tin water chestnuts, diced
1 cup shredded cabbage
2 tbsp cilantro, rough chop (and more for garnish)
1/2 tbsp grated ginger
3 cloves garlic, diced
1 head butter leaf or bibb lettuce, core removed and leaves separated and washed
toasted sesame seeds for garnish

Start by warming canola oil over medium high heat in a large skillet.  Season sliced chicken with salt & pepper and brown in skillet.  Once browned, transfer to plate and discard any remaining oil in pan.  Combine hoisin sauce, tamari, rice wine vinegar and sesame oil and transfer to skillet, reduce heat to medium low.  Add jalapeno, red bell pepper, mushrooms, half of the green onions and carrots to soften for about 4-5 minutes.  Once softened but still colorful, add cabbage, water chestnuts, cabbage, cilantro, garlic and chicken.  Turn to coat in sauce and continue to cook over medium low heat for an additional 2-3 minutes or until heated through.

Line a serving dish with the lettuce leaves and transfer the spicy chicken mix to the middle of the plate.  Top with remaining spring onions, toasted sesame seeds and a garnish of cilantro…serve with Sriracha for an added kick!

Wednesday, April 27, 2011

Sweet Honey Ham Pizza with Fig Jam and Carmelized Shallots

Like many in the South, we had a delicious spiral-cut honey ham glazed in a honey mustard mixture for our Easter dinner.  I look forward to it every year, mainly because there are lots of leftovers and since Easter was at my house this year, those leftovers were mine all mine!  I did (begrudgingly) share with my husband this time around and with his love of all things pizza and my love of new recipes, we came up with a good use for the mounds of ham left in the fridge.  Honey ham pizza, who knew?!  I added a few other items that have become staples in my house because they are tasty and can help to create some pretty fantastic dishes:  fig spread and shallots.  I first had fig spread smeared over a hard, sharp Parmesan and served with wheat crackers.  It is perfectly sweet with a melt in your mouth texture which compliments lots of cheeses.  Shallots are a no-brainer.  They are a little milder than a regular onion and truthfully, I think I like them most for their compact size.  Usually one or two are the perfect amount for any dish which means no leftover, diced up, ready-to-dry out onion pieces to store.  But I digress...onto the pizza compilation!


Homemade pizza dough:

1 1/2 cups water (80°-90°)
1 1/2 tsp honey
2 tsp salt
2 tbsp extra virgin olive oil
4 cups bread flour
2 1/4 tbsp active yeast

Mix, knead and rise in a bread maker or add the above ingredients in a stand mixer with dough hook.  Mix until combined, cover with a damp towel in warm spot to rise.  Deflate dough and form into rounded disk.  Cut in 1/2 for two 12" pizzas.  To make a pizza round, form back into rounded disk on a floured surface.  Using fingertips. press edges out all the way around the outer edge, rotating the dough as you press out.  Push the center out and repeat pressing edges out until large enough to cover pizza stone or pan without going over.

Toppings:
extra virgin olive oil
3 tbsp fig spread
1 medium to large shallot, caramelized in olive oil and butter and deglazed with dry white wine (sauté until cooked out)
1/2-1 cup cubed honey ham
3/4 cup pizza cheese blend
2 tbsp freshly grated Parmesan


Transfer formed pizza round to stone or pizza pan.  Add 2 turns of extra virgin olive oil and smooth over entire dough surface, including crust.  Spread fig jam over pizza, add caramelized shallots, honey ham and cheese.  Bake at 400° for about 10 minutes until bubbly in the center.  I like to flip the broiler on at the end and get it nice an browned on top...but that's really up to you and your desire for under or over!


Tuesday, April 12, 2011

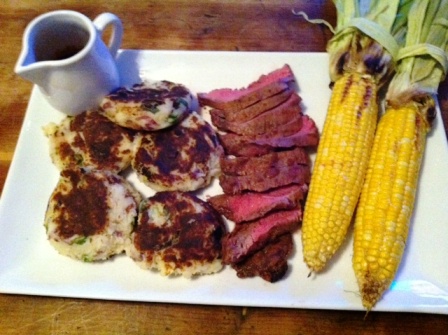
Bloody Mary Flat Iron Steak with Scallion Potato Cakes

I am in love with Flat Iron Steak. Really. I might marry it. Okay, instead I will marinate it in a bloody mary cocktail blend and grill it to perfection. I actually let this one marinate overnight which is hard for me because I am impatient when it comes to food. It worked in my favor though so maybe I'll take a lesson learned. The meat turned out tender and less tough than it has in the past. The flavor showed the perfect hint of tomato, horseradish and all-around-goodness. I also reserved some of the marinade to reduce with honey and pour over the cakes and steak at the end. Here's the blend I used:

Spicy Bloody Mary Marinade

1/2 cup olive oil
1 cup Spicy Hot V8
1 tbsp pickle juice
1/2 lemon, fresh squeezed
2 tsp creamy horseradish
1 tsp celery seed
1 garlic clove, diced
dash of Frank's hot sauce
salt & pepper  

Whisk together all ingredients and set about 1/4 cup aside.  Place the flat iron steak in a gallon sized ziploc and pour marinade over, moving around to coat all sides.  Place in a shallow dish to prevent spillage and refrigerate overnight, turning once to marinate both sides equally.  

When ready to cook, remove steak from the marinade and pat dry.  Grill over medium-high heat for about 5 minutes on each side depending on how well done you prefer your steak.  Let rest for 10 minutes and slice on a bias to serve.

Bloody Mary Steak Sauce

Using the reserved marinade, place in saucepan over medium-high heat and add about 2 tbsp of honey to thicken and sweeten.  Bring to boil and then reduce to simmer, whisking often while the steak rests.  Serve in a gravy boat for each person to pour over servings.

Scallion Potato Cakes

6-8 red potatoes
2 scallions, chopped in thin slices
2 tsp creamy horseradish
salt & pepper
1 tbsp extra virgin olive oil

Boil potatoes with skin-on and in salted water until soft.  In a large mixing bowl, mash potatoes, add chopped scallions, horseradish and salt and pepper to taste.  Blend until smooth.  Using hands, form into patties as you would hamburgers (will make 4-5 cakes).

In a frying pan over medium heat, add olive oil to warm.  Transfer potato cakes to oil and cook until golden brown on both sides, approximately 4-5 minutes per side.

Wednesday, April 6, 2011

Spicy and Crunchy Peanut Noodles


For years I've been searching for an Asian inspired noodle recipe with a salty/sweet peanut sauce and, finally, one from Ina Garten (Barefoot Contessa) appeared on Food Network .  I tried her version first and then adjusted the ingredients according to my own tastes and preferences.  I've made this dish several times now and each time someone has asked me for the recipe, which is my own personal gauge of a successful conversion, so I figured it was time to share.


Below is a list of the ingredients I use to make the recipe gluten-free, the first of which is brown rice spaghetti pasta.  While I am a fan of rice pasta, this is the first recipe I've tried where I would say the brown rice spaghetti is a natural fit.  If you aren't gluten free and would like to save some cash, stick with the traditional angel hair pasta and swap the tamari for straight soy.

Spicy and Crunchy Peanut Noodles

Serves: 6
Time: 25-30 minutes

1 lb brown rice spaghetti noodles
1/2 cup canola oil
1/4 cup lite rice wine vinegar
1/3 cup gluten free tamari
3 tbsp sesame oil
2 tbsp honey
2 garlic cloves, minced
1 tsp fresh grated ginger
zest of 1 lime
1/2 cup organic smooth peanut butter (I like Trader Joe's because it pours from the jar which makes it great for sauce)
2 tbsp toasted sesame seeds
2 red bell peppers, cored and seeded and sliced in thin strips
1/2 pound fresh snow peas, cut on an angle in half
4 scallions, cut on an angle
3 tbsp fresh cilantro
2 tbsp unsalted peanuts, chopped
1/2 pound cooked shrimp, peeled and deveined

Start by dropping the pasta into salted boiling water and follow the instructions to cook to al denté. While the pasta cooks, whisk together the oil, vinegar, tamari, sesame oil, honey, garlic, ginger, red pepper flakes, zest, peanut butter and seeds.  In a large mixing bowl, toss red pepper, peas, 2/3's scallions and shrimp.  Add cooked pasta and cover with sauce (use half or all of sauce depending on personal taste).  Top with remaining scallions, cilantro and peanuts to serve. 

A few things to note: 

This recipe makes a lot of sauce.  If using the full pound of spaghetti, you can definitely use all of the sauce and there will be some left at the bottom of the bowl.  If you like less sauce, jar the remainder and use it as a dip for spring rolls, chicken satay or grilled shrimp.   Also, this dish is great served warm, cold or at room temperature.  Leftovers will work for a day or so but the longer the noodles sit, the more they will break down because of the acid in the sauce.  And finally, for an even bigger punch of flavor - serve lime wedges on the side to squeeze over the noodle bowls.

Tuesday, April 5, 2011

Balsamic Reduction Two Ways

It's one of the easiest and most versatile tricks in the kitchen - balsamic reduction.  All it takes is the vinegar, a sauce pan, a whisk and heat and you have a syrupy topping that can be used on anything from chicken to ice cream.  I recently discovered white balsamic vinegar which is essentially the same as it's darker counterpart  but a little less thick, a little less sweet and, as you would imagine by the name, clear.  It's processed in a similar manner with white grapes and white wine vinegar and simmered over low heat to develop the syrup and then aged to enrich the flavor.  In my opinion, the real advantage to swapping for the clear version is purely aesthetic; you get the flavor without changing the coloring of your food. 


To make a reduction, simply pour the balsamic vinegar into a sauce pan and bring to a boil, whisking often so as not to burn. Reduce the heat to let it simmer until the liquid reduces by half. Word to the wise - stand back when the heat hits the vinegar unless you are looking to clear your sinuses.


Balsamic Glazed Asparagus Spears

14-16 thin, fresh Asparagus spears
1/2 tbsp olive oil
salt & pepper
1 tbsp balsamic reduction
2 slices honey ham
1 plum tomato, seeded and diced
1 tbsp freshly grated Parmesan cheese

Snap asparagus spears at the bottom at natural breaking point to remove tough stems. Coat with olive oil and salt and pepper and place over indirect heat on a preheated grill.  Baste with balsamic reduction while the spears cook for approximated 6-8 minutes.  Halfway thru grilling, divide spears equally and place one slice of ham over each group to warm. Pull from grill and roll spears into a 'log', folding ham over the group and placing seam side down.  Top with diced tomato and grated cheese to serve. The sweetness of the ham is the perfect compliment to the balsamic reduction. 


Balsamic Glazed Chicken

1 lb boneless, skinless chicken breasts
2 tbsp extra virgin olive oil
1 tbsp balsamic vinegar
salt and pepper
2 tbsp balsamic reduction

Clean and trim the chicken breasts, salt and pepper liberally and place in a shallow container. Whisk together the olive oil and balsamic vinegar and pour over chicken.  Let the meat rest in the refrigerator for about 1 hour. 

Preheat the grill to about 400° and oil grates prior to placing the marinated chicken on the grill.  While the chicken cooks (about 5 minutes on each side), baste liberally with the balsamic reduction.  Let chicken rest for about 5 minutes prior to serving.


You'll find yourself using this reduction on everything...promise!

Tuesday, March 1, 2011

Double Chocolate Gluten Free Cookies

On Saturday mornings, I like to sneak downstairs and turn on the Food Network to get some inspiration for the weekend. I see chefs and shows that aren't on weeknights so it's like a special little treat for me to kick off my weekend. This Saturday was even brighter because the theme was 'comfort foods'- isn't that what the weekend is all about?!  For those of you that missed it, Giada De Laurentiis did a little dessert that will now be archived into my index of cooking fame - Double Chocolate and Espresso Cookies.  Keeping on my gluten-free train, I modified the ingredients and baked them up before my husband was even out of bed.  Here's the original recipe and my swaps:

Double Chocolate and Espresso Cookies

Recipe courtesy Giada De Laurentiis

Prep Time:
12 min
Inactive Prep Time:
--
Cook Time:
19 min
Level:
--
Serves:
10 to 12 cookies

Ingredients

  • 6 ounces semi-sweet chocolate, chopped into 1/2-inch pieces (recommended: Ghirardelli)
  • 2 tablespoons unsalted butter, at room temperature
  • 1/3 cup dark chocolate-covered espresso beans (I used a little less than 1/3 cup instant ground coffee)
  • 1 cup flour (I used Red Mill's Gluten-free All Purpose Flour)
  • 2 tablespoons unsweetened cocoa powder
  • 1 teaspoon baking powder
  • 1/4 teaspoon fine sea salt (I used Kosher Salt)
  • 3/4 cup sugar
  • 2 eggs, at room temperature
  • 2 tablespoons water
  • 1 teaspoon pure vanilla extract
  • 1 cup semi-sweet chocolate chips (recommended: Nestle Toll House - I used Milk Chocolate)

Directions

Place an oven rack in the center of the oven. Preheat the oven to 300 degrees F. Line 2 baking sheets with parchment paper or silicone mats - my silicone mat worked like a charm for this recipe.  They slid right off with no trace of chocolate behind. 

In a small bowl, combine the chocolate bar and butter. Place the bowl over a pan of barely simmering water and stir occasionally until the chocolate has melted and the mixture is smooth.
In the bowl of a food processor, finely chop the chocolate covered espresso beans (or instant coffee). In a medium bowl, whisk together the chopped espresso beans (coffee), flour, cocoa powder, baking powder, and salt.
In another medium bowl, whisk together the sugar, eggs, water, and vanilla extract. Gradually add the dry ingredients and stir until thick and smooth. Fold in the melted chocolate. Stir in the chocolate chips. Using a cookie or ice cream scoop, scoop level 1/4 cupfuls of the batter onto the prepared baking sheets (I used my small cookie dough scoop which yielded slightly smaller cookies, about 22-24 in total). Bake until slightly puffed and the tops begin to crack, 18 to 20 minutes. Allow the cookies to cool completely on the baking sheets and serve.

Thank you, Giada, for this amazing and simple recipe! 

Wednesday, February 23, 2011

Lean Chicken Meatloaf

Winter is rounding out her days but we try not to complain and just enjoy the quiet comforts of cold, dark days. The upside to the dreary days of February definitely is the hearty foods that beckon from the kitchen and it doesn't get much heartier than meatloaf.  Always looking for a healthier version, I used my old staple - ground chicken - and added lots of fresh veggies to 'beef' it up. Remember the Eddie Murphy skit about his mom's homemade burgers?  Yep, it looked just like that...green bell peppers and red onion chunks popping out all over the place. 


The vegetables gave it great flavor and texture and I threw in a little chipotle pepper to add some smoky heat to the loaf.  Served alongside canellini beans sauted in sundried tomato oil and finished with arugula, this meal was fit for the darkest of winter nights.

Lean Chicken Meatloaf


Preparation time:  10 minutes
Cook time: 35 minutes
Serves: 4-6

1/2 medium green bell pepper, small dice
1/2 red onion, small dice
4 baby bella mushrooms, small dice
2 sundried tomatoes (in oil), small dice
1/2 small chipotle pepper in adobo sauce, small dice
1/2 tbsp Italian seasoning
1/2 tsp garlic powder
1/4 tsp red pepper flakes
1/4 tsp fennel seeds
1 tsp salt
1/2 tsp black pepper
1 egg, lightly whisked
1 lb ground chicken
1 cup marinara
3 slices thick cut bacon, halved

Preheat the oven to 400°.  In a large mixing bowl, combine all of the above ingredients, reserving the marinara and the bacon for the top.  Combine by gently 'folding' the vegetables, spices and egg into the ground chicken so as not to overwork the meat.  Once combined, form into a loaf in a baking dish with raised sides.  Cover the loaf with the marinara and arrange the 6 slices of bacon over the top.  Cover the dish with foil and place in the oven to bake.  At 25 minutes, remove the foil and bake for another 10 minutes for the bacon to crisp.  Finish on a low broil for approximately 2 minutes if the bacon doesn't cook through.

Transfer to a serving dish, slice at each strip of bacon for the perfect serving size and enjoy!

Wednesday, November 3, 2010

Local Market Pan Roasted Kohlrabi and Brussels Sprouts

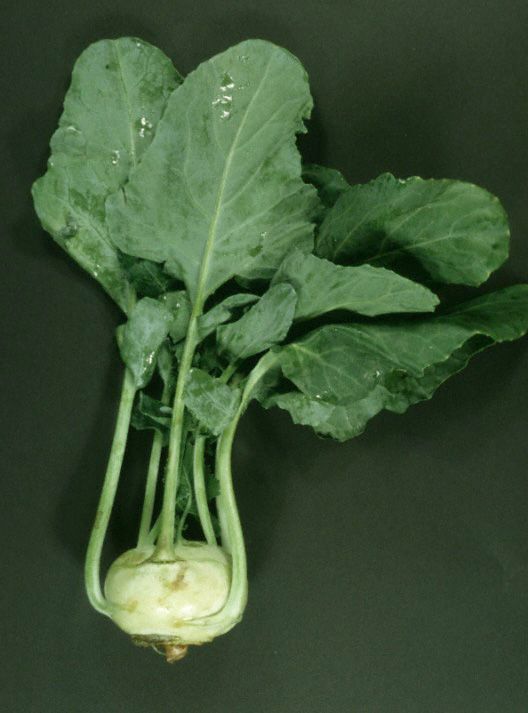
It was a crisp Saturday morning at the market and there were still plenty of foodies to be found plus a few new selections in the produce department-one of which being a cousin to cabbage, kohlrabi.  For those of you not familiar with kohlrabi, it is a crazy looking, softball-sized, bulbous vegetable that resembles a turnip in shades of either purple or light green color.   The leaves can be eaten but the flesh of the vegetable is usually what people are after. It has a taste similar to that of the stem of broccoli, soft enough to eat raw once peeled but also delicious when cooked. 
Cooking for two, I grabbed kohlrabi from Thistledowne Farm and a small bunch of brussels sprouts from Pleitez Produce to make a delicious and seasonal side dish.  Here’s how it came together:
Pan Roasted Veggies:
1 tsp olive oil
2 tbsp cubed pancetta
1 tbsp butter
1 kohlrabi head
8 brussels sprouts, halved
1 tbsp apple cider vinegar
hot sauce
salt & pepper
Start by removing the stems and leaves from kohlrabi and peeling outer layer. I used a paring knife and trimmed the outside much like I would a mango (trim the bottom to create a flat surface to stand veggie upright, use knife to trim about 1/4 inch off flesh, working from the top of the veggie down and rotating until all exterior is removed).  Cut into bite sized pieces that are roughly the same size as the halved brussels sprouts.
Add tsp olive oil and pancetta to a skillet over medium heat to brown.  Once a good color has formed on the pancetta, transfer to a plate to reserve and drain excess grease.  Add butter to the same skillet and transfer brussels sprouts and kohlrabi, season with salt and pepper.  Using a spatula, move the vegetables around to coat all in the butter and pancetta drippings.  Continue to cook for 6-8 minutes, stirring occasionally to develop caramel color.  To finish, lower heat, add apple cider vinegar and a few dashes of hot sauce and add the pancetta back into the skillet.  Toss to coat and serve warm.
Pork Chops with Mushroom Gravy and Pan Roasted Kohlrabi & Brussels Sprouts
We also picked up a quart of Apple Cider from the Thistledowne booth (cider from Morris Orchard in Monroe, VA) for Hot Spiced Cider (cider + Captain Morgan’s + cinnamon + cloves + warmed on the stove = delicious) and a half loaf of 1/2 Whole Wheat bread from Norwood Cottage Bakery, whose last SOTJ market appearance was last Saturday.  Not to worry though, they now have two online ordering options for Fall and Winter, be sure to check out their website for more details.

Wednesday, October 27, 2010

Pancetta Pumpkin Fritters with Cinnamon Whipped Cream

Delicious, sweet and salty, non-traditional seasonal dessert that comes together in no-time flat!
Pancetta Pumpkin Fritters with Cinnamon Whipped Cream

Fritters:
1 cup pumpkin*
2 tbsp melted butter (unsalted)
1/3 cup brown sugar
1/2 tsp salt
1/2 tsp ground cinnamon
1 large egg
1 cup all purpose flour
1/4 cup breadcrumbs made from cinnamon bread  (cut into bite size pieces and toast in oven until dry.  Once toasted, whirl in blender to make crumbs.)
1 tbsp baking powder
1/4 cup Pancetta, small dice

Cinnamon Whipped Cream:
1 cup heavy whipping cream
1 tbsp + 1 tsp powdered sugar
1/4 tsp ground cinnamon
1 tsp vanilla

To make whipped cream:
Add heavy whipping cream to a medium size mixing bowl and begin to incorporate air into the cream using hand mixer on low.  Increase speed and once thickened slightly, add sugar, cinnamon and vanilla.
Continue to blend until stiff peaks form, cover bowl with plastic wrap and keep refrigerated until ready to serve.

To make batter:
Blend pumpkin and butter until smooth and then add sugar, salt & cinnamon.  With a whisk, blend in egg until fully incorporated. Slowly whisk flour and breadcrumbs into batter.  Using a spoon, fold Pancetta into mix.

To fry:
In a large, heavy bottomed pan, add 50/50 canola, vegetable oil blend until at least 1" deep.  Heat the oil to 325°.  Working in batches, use a small cookie scoop to drop rounded spoonfuls of batter into the oil.  The fritters will start to float when they need to be flipped. Cook approximately 1 minute per side or until golden brown.  Keep warm in oven while working through remaining batter.  Serve warm with Cinnamon Whip Cream and a sprinkle of powdered sugar.

Makes approximately 20-25 fritters. 

*Fresh roasted pumpkin is best, roast in oven with a sprinkle of 1 tbsp brown sugar at 350° for about 20-25 minutes or until soft to touch.  If fresh pumpkin is not available, substitute with canned.

Monday, October 25, 2010

Deal of the Week - Williams Sonoma Festive Cornucopa Bundt Pan

I had to post this one because it is a good deal for a seasonal kitchen item and the cake would make a fantastic centerpiece for Thanksgiving.  Here's the description and the deal:


Grapes, gourds and corn cobs spill out of our cornucopia basket, a timeless symbol of the harvest. Even children will find these fruits and vegetables irresistible, as they’re actually buttery cake that’s baked in our autumnal variation on the classic Bundt pan.

    * The pan’s intricate design means a simple dusting of confectioners’ sugar is all the decoration the cake needs.
    * Crafted of durable, heavy cast-aluminum for efficient, even baking.
    * Premium nonstick interior ensures perfect detail, effortless release and cleanup.
    * Made in the USA by NordicWare, renowned creators of the original Bundt pan and a family-owned company since 1946.
    * A Williams-Sonoma exclusive.


Normally $34.00, on sale for $19.99!

Click here for the website listing.  I think I'll use it for our rum cake...

Thursday, October 21, 2010

Pumpkin Ravioli with Alfredo Sauce

Pumpkin Everywhere!   If you've never cooked with fresh pumpkin, it is time to try it.  I've seen an abundance of sugar pie pumpkins this year so I grabbed one and turned it into two successful recipes to date.  One of which was enjoyed for last night's supper club: Pumpkin Ravioli with Alfredo sauce. 

To start, you'll need to slice the pumpkin into manageable wedges.  Scrape out the pumpkin seeds and don't even think of tossing them, they make a delicious treat all on their own.  In an oven at 350°, roast the pumpkin wedges with a sprinkle of brown sugar for about 15-20 minutes or until brown and slightly caramelized on top. Let it cool so you can handle easily.

Here's the recipe for the ravioli filling:
2 cups pumpkin
1/4-1/2 cup grated Parmesan cheese
1/4 cup Panko breadcrumbs
1 egg (lightly beaten)
1/4 cup Pancetta diced & sautéed until browned
1/4 tsp cinnamon
Pinch of nutmeg
salt and pepper to taste

All ingredients go into a mixing bowl and are combined with a spoon or spatula until fully incorporated.

Now the fun part - stuffing the wrappers! Usually near the refrigerated soy products in your grocery store, you can find wonton wrappers.  I used the brand pictured below last night and they were just the right thickness.  On a clean surface, layout individual wonton wrappers in a row.  Scoop a small amount (about 1/2 tsp to full tsp), onto the center of each wrapper (a small cookie dough scoop works really well for this step).  Next, wet your pointer finger in a bit of water and trace you finger over the outer edge of the entire wrapper. Fold the wrapper over from corner to corner to form a triangle, the water will act as a glue. Push down slightly around the filling to try and remove as much air as possible and press the edges to form a seal.  Finally, bring the bottom two corners together to form an envelop shaped ravioli.  Transfer to a cookie sheet for holding.

Once all ravioli are stuffed (this recipe makes 48 ravioli with a little filling leftover), they can either be transferred to the freezer or cooked immediately in salted boiling water (ravioli will float when cooked through).  If freezing, freeze in a single layer on the cookie sheet so that the ravioli do not touch. This will prevent them from sticking together.  Once frozen, they can be transferred to a plastic ziploc for freezer storage.


Alfredo Sauce:
1/2 stick unsalted butter
1 cup heavy whipping cream
1 & 1/4 cups Parmesan-Reggiano
Salt & Pepper
Parsley to finish

In a medium sauce pan, melt butter over low to medium heat.  Add cream and combine with whisk.  Let simmer for about 3 minutes and add cheese, whisking to blend.  Keep temperature on low and when ready to serve, add salt and pepper to taste and chopped parsley. 

Unfortunately, my pictures were deleted but trust me when I say that this is a seasonal favorite that will be a big hit!

Tuesday, October 19, 2010

Pork Roast with Lemon Sage Sauce and Candied Carrots


Today's recipe is a throw back to my childhood, when parents and grandparents alike fought to get kids to eat their vegetables.  This recipe, along with the 'carrots help you see at night' story, definitely got us into veggies.   So, I picked up a small bunch of baby carrots from Fertile Crescent Farm and paired the side dish with roast pork finished with citrus/herb sauce.  Here's the fix:
Candied Carrots:
1 bunch of baby carrots
2 tbsp butter
2 tbsp brown sugar
salt & pepper
canola oil
Simple, simple, simple. Preheat the oven to 350°.  Chop stems off carrots, rinse and peel. In a sauté pan over medium-lo heat, add a drizzle of canola oil and the butter to melt.  Add carrots and toss to coat.  Cook for approximately 2-3 minutes and then add brown sugar, pinch of salt and a crack of black pepper.  Toss to coat and then transfer to a non-stick roasting pan and place in oven for about 10 minutes or until a nice caramelization forms.  Flip once to get all sides evenly browned.  Serve warm.
Pork Roast:
1 1-1.5 lb pork roast
1/4 cup extra virgin olive oil
Zest from 1/2 lemon
Juice from 1/2 lemon (or whole if it does not render enough liquid)
1 tsp capers (with liquid)
4-6 leaves fresh sage chopped
bay leaf
salt & pepper
Start by brining the roast which will make the meat moist and flavorful.  In a large ziploc, add olive oil, lemon zest, juice and sliced lemon, capers, chopped sage and bay leaf.  Towel dry the pork roast and season with salt and pepper.  Transfer the roast to ziploc, add about 1/2 tbsp more salt, seal tightly and toss the mixture, massaging the liquid into the roast. Make sure all liquid is equally distributed around the roast and place bag into the refrigerator for 20 minutes (the acid from the lemon will start to 'cook' the meat so it should be removed from the brine within 30 minutes at the most).  Remove from the refrigerator, pull the roast out, pat dry and discard the liquid.  Let the meat come to room temperature. 
Warm a cast-iron skillet over medium heat with about 1 tbsp olive oil.  Sear the roast on all sides, about 2 minutes per side. Next, transfer the skillet with roast into an oven at 350° and roast for 15-20 minutes.  The roast should rest under an aluminum foil tent for at least 5 minutes before slicing.  Meat should come out juicy and slightly pink in the middle.  For safety, internal temperature should be reach 160°.
I finished the pork with a super simple lemon sage sauce...combine 2 tbsp 2% plain Greek yogurt, 1 tsp olive oil mayonnaise, zest from 1/2 lemon, 1 tsp lemon juice and 3 leaves fresh chopped sage.  Season with a little salt and spoon over sliced roast!